Craft Show {Booth Design}
When I was considering signing up for the Indie Craft Parade back in June, booth design was my biggest obstacle. I know I can make stuff. I know I can sell stuff (I have a retail background). But could I design a booth I'd be proud of... on a budget?
In my (very limited) experience at cool craft shows, booth design makes a big impact on my desire to look closer at someone's goods. What's more, a fun booth is likely to draw me back, because the memorable experience is imprinted on me as I continue to browse the fair. I know a booth should also express my brand, so people can see at a glance what I'm about and feel "at home" if they ever visit the blog. That and it needs to be affordable, portable, and successful at actually presenting my products. Oi.
Booth Parameters
Ok, so step one... what do I have to work with? I found out that the Indie Craft Parade generally only allows walk-by booths, rather than walk-in. My booth is 8' long. I can choose to have an 8' table separating me from the customer traffic or a 4' table and a "vertical" display area (like a tall shelf or rolling rack). The booth is about 4' deep from my side of the table to the black cloth partitions defining my space. I can only hang light items on the partition. And, anything hanging there is out of reach of customers, involving my participation for their access.
I know from experience that the walkways at Indie Craft Parade are packed with people. This no-entry booth requirement keeps traffic flowing, which might be a challenge. I want a booth that isn't easy to pass by.
Product Needs
Before I could get down to the business of designing a booth, I had to figure out what I'd be selling. In my Inventory Planning post, I explained my thought process in choosing products. Limiting myself to a few key product types gives my booth design focus. For example, I want to try to sell those baby quilts, but my product range is not all about quilts. I expect my covered journals to be my strongest category, so I started by deciding how to present them - in a basket of sorts on a table. Then I figured the table would also be good for iPad sleeves, coasters and the misc. small items from my "finished projects" cabinet.
But, everything won't work on a table. Folded and stacked quilts are too easy to pass by. (And, I imagine I'd be refolding them all day.) Wall art needs to be hung. I want to have some picnic blankets (aka lightweight summer quilts) rolled up to show off their tidy, ready-to-travel persona. But, open picnic blankets are far more fun to explore.
The solution? I opted for the 4' table for my table top items; a rolling rack to hang baby quilts, a few open picnic blankets and large misc. projects; and a backdrop on which I can also hang wall art. The rolling rack + table arrangement was largely inspired by this lovely boot. But, I won't have tall items on the table or the tall mannequin, so my backdrop will still be visible as a place to hang wall art.
Aesthetic
Ok, the fun part! What does my "brand" look like anyway? Well, if you look through my blog with an eye for the details, you'd see I often photograph colorful products on a dark wood table. In my blog header, I often place "Stitched in Color" over a dark section of the photograph with the text in white and yellow. Generally, I sew with lots of color. And, I make things with fabric. Yep, fabric is important!

Boiled down, I wanted to incorporate: fabric, color and wood. Right away, I set my heart on a wooden sign. My husband is a hobbyist woodworker, so we already have the tools and even the wood stain to make a dark wooden sign. Heather volunteered to paint "Stitched in Color" on it. All I'd have to buy is one piece of pine!

After surfing the internet for booth ideas (check out the Indie Craft Parade pictures) I envisioned a wall of fabric strips with the wooden sign floating in front. Enter Kona jelly rolls! Robert Kaufman's Kona jelly rolls have 2.5" wide by 4" long strips of solid fabrics with fray-resistant pinked edges. Two rolls of the new Kona colors is a great assortment of modern colors with lots of neutrals too. I did "edit" the color collection, using only the limey green and none of the purples. I had strips left over in most colors, but used all of the yellow, limey green, gray and whites. I love color, so I enjoyed laying out the strips in a pleasing order that reflects my personal taste in colors. (New Color Jelly Rolls available here and here.)
In the end I think it turned out brighter than I might have liked, but at least it'll be eye catching. That's sure.

Besides the background, my "aesthetic" is reflected in bits and pieces. I'll use a large cut of natural linen with pinked edges as a tablecloth. Wooden hangers and natural baskets will enhance a "natural" vibe. Only the rolling rack will be shiny metal. I resisted that, but we already own a rolling rack from our maternity and baby online stores, so it's practical to use what's on hand.
Backdrop How To's
Yesterday my mom and I completed the backdrop and it was so. much. fun. Also really quite easy! If you need a colorful backdrop for your show or event, here are the nuts and bolts. Remember, you can always customize the color scheme. Kona also has pastel, dusty and classic color rolls, or even rolls of all one neutral color (see options).

The jelly roll strips are just 44" long, which is perfect. With the table/rolling rack going on, my customers won't see much below table height.
First, get a 2" x 2" piece of wood to support the backdrop as "skeleton" of sorts. This is the bar from which everything will hang. My booth is 8' long, so Brandon cut our length of wood 2" short of 8'. If you don't have woodworking equipment, ask your home improvement store to cut it to length when you buy it. Most are happy to help! I suggest a wooden skeleton if you're hanging a wooden sign, for strength. If you're using a lightweight sign, you could use something much lighter like a long dowel, rope or strong string to suspend your backdrop elements.
Next, figure out what stands you can use to support the skeleton. There are lots of creative ways to build a support system with wood, you could also stack something strong (like crates) or possibly attach/hang it from the partition of your booth if your backdrop is lightweight.

Since we have a lighting studio for our online store, we used light stands to support the wooden beam. As a bonus, these stands are lightweight and collapsible. Brandon used a drill bit to make a hole in the beam that the tip of the light stand can nest inside.

The hole does not go all the way through the beam, so the weight of the backdrop can rest on the stand. After drilling the holes, he painted the wooden beam black in keeping with my dark + color aesthetic. For a lighter aesthetic, use raw wood!

To make sure everything's secure, we used another photographer's trick - sand bags - to anchor each stand. This baby's not going anywhere!

The rest was easy-peasy. My mom and I stapled the fabric strips to the back of the wooden beam with overlapping pinked edges. If you have a smaller skeleton, such as rope or a dowel, it would be cute to tie the strips at the top!

Last of all, I tied up the wooden sign with Robert Kaufman ribbons from the Kona jelly rolls. Waste not, want not! And.. text.

I'm planning to hang my wall art from the backdrop too! That's another reason I want it to be strong and sturdy. I'm thinking maybe fishing line or thread to hang the art pieces at different heights around the sign? I won't be able to fit them all at once, but as pieces sell new pieces can go up. For awhile I worried that my super-colorful backdrop is not ideal for showing off wall art, like a neutral backdrop would be. But, the upside is that it's very eye-catching and will look good without the wall art, if things sell.
Next Steps
Now that my backdrop is settled and I have a plan for the rest, I'm collecting baskets and other misc. pieces for the final display. The best way to figure out those details is to set up the whole kit and kaboodle - a full booth mock-up with products. I'll be doing that before the show and can't wait! I definitely won't feel "ready" until I've seen it for myself.
 Psst... Indie Craft Parade runs September 7-9 in Greenville, SC to the tune of
thousands of guests. Tickets to get in for the Friday night Gala are
$25. Admission is free on Saturday and Sunday and there are cool craftsy workshops on Saturday! Maybe I'll see you there?
Psst... Indie Craft Parade runs September 7-9 in Greenville, SC to the tune of
thousands of guests. Tickets to get in for the Friday night Gala are
$25. Admission is free on Saturday and Sunday and there are cool craftsy workshops on Saturday! Maybe I'll see you there?
In my (very limited) experience at cool craft shows, booth design makes a big impact on my desire to look closer at someone's goods. What's more, a fun booth is likely to draw me back, because the memorable experience is imprinted on me as I continue to browse the fair. I know a booth should also express my brand, so people can see at a glance what I'm about and feel "at home" if they ever visit the blog. That and it needs to be affordable, portable, and successful at actually presenting my products. Oi.
Booth Parameters
Ok, so step one... what do I have to work with? I found out that the Indie Craft Parade generally only allows walk-by booths, rather than walk-in. My booth is 8' long. I can choose to have an 8' table separating me from the customer traffic or a 4' table and a "vertical" display area (like a tall shelf or rolling rack). The booth is about 4' deep from my side of the table to the black cloth partitions defining my space. I can only hang light items on the partition. And, anything hanging there is out of reach of customers, involving my participation for their access.
 |
| image courtesy of Indie Craft Parade |
I know from experience that the walkways at Indie Craft Parade are packed with people. This no-entry booth requirement keeps traffic flowing, which might be a challenge. I want a booth that isn't easy to pass by.
Product Needs
Before I could get down to the business of designing a booth, I had to figure out what I'd be selling. In my Inventory Planning post, I explained my thought process in choosing products. Limiting myself to a few key product types gives my booth design focus. For example, I want to try to sell those baby quilts, but my product range is not all about quilts. I expect my covered journals to be my strongest category, so I started by deciding how to present them - in a basket of sorts on a table. Then I figured the table would also be good for iPad sleeves, coasters and the misc. small items from my "finished projects" cabinet.
But, everything won't work on a table. Folded and stacked quilts are too easy to pass by. (And, I imagine I'd be refolding them all day.) Wall art needs to be hung. I want to have some picnic blankets (aka lightweight summer quilts) rolled up to show off their tidy, ready-to-travel persona. But, open picnic blankets are far more fun to explore.
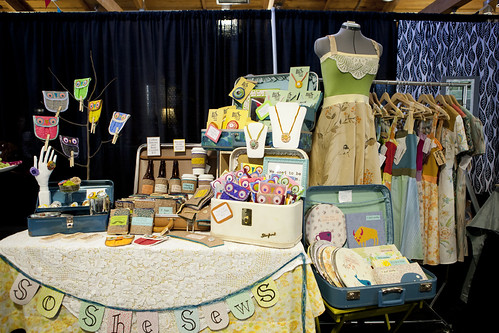 |
| So She Sews booth |
The solution? I opted for the 4' table for my table top items; a rolling rack to hang baby quilts, a few open picnic blankets and large misc. projects; and a backdrop on which I can also hang wall art. The rolling rack + table arrangement was largely inspired by this lovely boot. But, I won't have tall items on the table or the tall mannequin, so my backdrop will still be visible as a place to hang wall art.
Aesthetic
Ok, the fun part! What does my "brand" look like anyway? Well, if you look through my blog with an eye for the details, you'd see I often photograph colorful products on a dark wood table. In my blog header, I often place "Stitched in Color" over a dark section of the photograph with the text in white and yellow. Generally, I sew with lots of color. And, I make things with fabric. Yep, fabric is important!
Boiled down, I wanted to incorporate: fabric, color and wood. Right away, I set my heart on a wooden sign. My husband is a hobbyist woodworker, so we already have the tools and even the wood stain to make a dark wooden sign. Heather volunteered to paint "Stitched in Color" on it. All I'd have to buy is one piece of pine!
After surfing the internet for booth ideas (check out the Indie Craft Parade pictures) I envisioned a wall of fabric strips with the wooden sign floating in front. Enter Kona jelly rolls! Robert Kaufman's Kona jelly rolls have 2.5" wide by 4" long strips of solid fabrics with fray-resistant pinked edges. Two rolls of the new Kona colors is a great assortment of modern colors with lots of neutrals too. I did "edit" the color collection, using only the limey green and none of the purples. I had strips left over in most colors, but used all of the yellow, limey green, gray and whites. I love color, so I enjoyed laying out the strips in a pleasing order that reflects my personal taste in colors. (New Color Jelly Rolls available here and here.)
In the end I think it turned out brighter than I might have liked, but at least it'll be eye catching. That's sure.
Besides the background, my "aesthetic" is reflected in bits and pieces. I'll use a large cut of natural linen with pinked edges as a tablecloth. Wooden hangers and natural baskets will enhance a "natural" vibe. Only the rolling rack will be shiny metal. I resisted that, but we already own a rolling rack from our maternity and baby online stores, so it's practical to use what's on hand.
Backdrop How To's
Yesterday my mom and I completed the backdrop and it was so. much. fun. Also really quite easy! If you need a colorful backdrop for your show or event, here are the nuts and bolts. Remember, you can always customize the color scheme. Kona also has pastel, dusty and classic color rolls, or even rolls of all one neutral color (see options).
The jelly roll strips are just 44" long, which is perfect. With the table/rolling rack going on, my customers won't see much below table height.
First, get a 2" x 2" piece of wood to support the backdrop as "skeleton" of sorts. This is the bar from which everything will hang. My booth is 8' long, so Brandon cut our length of wood 2" short of 8'. If you don't have woodworking equipment, ask your home improvement store to cut it to length when you buy it. Most are happy to help! I suggest a wooden skeleton if you're hanging a wooden sign, for strength. If you're using a lightweight sign, you could use something much lighter like a long dowel, rope or strong string to suspend your backdrop elements.
Next, figure out what stands you can use to support the skeleton. There are lots of creative ways to build a support system with wood, you could also stack something strong (like crates) or possibly attach/hang it from the partition of your booth if your backdrop is lightweight.
Since we have a lighting studio for our online store, we used light stands to support the wooden beam. As a bonus, these stands are lightweight and collapsible. Brandon used a drill bit to make a hole in the beam that the tip of the light stand can nest inside.
The hole does not go all the way through the beam, so the weight of the backdrop can rest on the stand. After drilling the holes, he painted the wooden beam black in keeping with my dark + color aesthetic. For a lighter aesthetic, use raw wood!
To make sure everything's secure, we used another photographer's trick - sand bags - to anchor each stand. This baby's not going anywhere!
The rest was easy-peasy. My mom and I stapled the fabric strips to the back of the wooden beam with overlapping pinked edges. If you have a smaller skeleton, such as rope or a dowel, it would be cute to tie the strips at the top!
Last of all, I tied up the wooden sign with Robert Kaufman ribbons from the Kona jelly rolls. Waste not, want not! And.. text.
I'm planning to hang my wall art from the backdrop too! That's another reason I want it to be strong and sturdy. I'm thinking maybe fishing line or thread to hang the art pieces at different heights around the sign? I won't be able to fit them all at once, but as pieces sell new pieces can go up. For awhile I worried that my super-colorful backdrop is not ideal for showing off wall art, like a neutral backdrop would be. But, the upside is that it's very eye-catching and will look good without the wall art, if things sell.
Next Steps
Now that my backdrop is settled and I have a plan for the rest, I'm collecting baskets and other misc. pieces for the final display. The best way to figure out those details is to set up the whole kit and kaboodle - a full booth mock-up with products. I'll be doing that before the show and can't wait! I definitely won't feel "ready" until I've seen it for myself.
Psst... Indie Craft Parade runs September 7-9 in Greenville, SC to the tune of
thousands of guests. Tickets to get in for the Friday night Gala are
$25. Admission is free on Saturday and Sunday and there are cool craftsy workshops on Saturday! Maybe I'll see you there?