B is for baby
Is there anything sweeter on a sizzling hot summer day than resting indoors with needle in hand? No iron, no pattern pieces, just one careful stitch after another after another after another. And did you know that mama can mind the children while stitching? Most definitely. So, really, I vote to find a comfortable perch on the couch and stay put.
Thanks to a pregnant friend, you'll find me doing just that most evenings. A few weeks ago, Nancy and I flipped through Anna Maria Horner's book, Handmade Beginnings, for ideas on what I might make her.
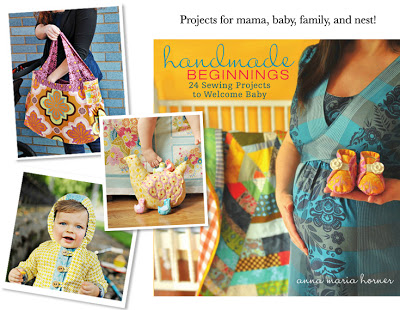 My first-time pregnant friend already has a crib set for her gender-neutral nursery. She's a very practical person, so I had this tiny fear that there may be nothing I could make her that would really meet her needs. But, when she saw this

she completely fell in love. Which makes sense - wall decor can be so hard to come by. I about jumped up and down to see she'd chosen Anna Maria's "Writing on the Walls" project. Embroidery! Applique! Yes, please!!!
Nancy and I love the way Anna used differently shaped canvases and both lowercase and capital letters. We're also going to make the word "baby" so that Nancy can keep the same decor for future children. Basically, we love everything about it, so all I need to do is recreate this charming design!

After all of the creative work I've been doing lately for the book proposal, it was such a treat to simply follow Anna Maria's lead. Albeit in a completely different color scheme. Going with gender neutral, Nancy chose brick red, pale yellow and bark brown for her colors. To be honest, these colors are well outside my comfort zone, and I was pretty nervous during the process of making this "B" that my embroidery floss was all wrong.

But, placed beside to the beginnings of the next letter I'm thinking it works after all. Right?
Please just nod. I asked my husband if it worked and then realized it was like asking him "does this dress make me look fat?" There's only one right answer ;)

The best part of embroidery is the stitching part, of course. But first there's the pesky work of transfering the design to your fabric. In this case, I used Photoshop to create a capital "B" in the desired height. Using the stroke tool, I gave the "white" letter an outline in black so that I could print it without using a lot of ink. Next, I used Saral transfer paper to transfer the letter. Saral is paper that you place between the design and your fabric. Then you trace the design with a stylus (I used a ballpoint pen) and the pressure transfers the design onto the fabric. Saral can be washed off or rubbed off and doesn't become set when ironed. I love it!

The sparkles are my favorite part!
Thanks to a pregnant friend, you'll find me doing just that most evenings. A few weeks ago, Nancy and I flipped through Anna Maria Horner's book, Handmade Beginnings, for ideas on what I might make her.
she completely fell in love. Which makes sense - wall decor can be so hard to come by. I about jumped up and down to see she'd chosen Anna Maria's "Writing on the Walls" project. Embroidery! Applique! Yes, please!!!
Nancy and I love the way Anna used differently shaped canvases and both lowercase and capital letters. We're also going to make the word "baby" so that Nancy can keep the same decor for future children. Basically, we love everything about it, so all I need to do is recreate this charming design!
After all of the creative work I've been doing lately for the book proposal, it was such a treat to simply follow Anna Maria's lead. Albeit in a completely different color scheme. Going with gender neutral, Nancy chose brick red, pale yellow and bark brown for her colors. To be honest, these colors are well outside my comfort zone, and I was pretty nervous during the process of making this "B" that my embroidery floss was all wrong.
But, placed beside to the beginnings of the next letter I'm thinking it works after all. Right?
Please just nod. I asked my husband if it worked and then realized it was like asking him "does this dress make me look fat?" There's only one right answer ;)
The best part of embroidery is the stitching part, of course. But first there's the pesky work of transfering the design to your fabric. In this case, I used Photoshop to create a capital "B" in the desired height. Using the stroke tool, I gave the "white" letter an outline in black so that I could print it without using a lot of ink. Next, I used Saral transfer paper to transfer the letter. Saral is paper that you place between the design and your fabric. Then you trace the design with a stylus (I used a ballpoint pen) and the pressure transfers the design onto the fabric. Saral can be washed off or rubbed off and doesn't become set when ironed. I love it!
The sparkles are my favorite part!
