Penny Patch: Backing & Finishing
This post is part of a series a Beginner’s Quilt-Along. You can join in anytime, even if you’re not a beginner!
Please see this page for links to all posts, and join us on Flickr to share your questions and work-in-progress!
 Let's finish those quilts! If this is your first quilt, by any chance, I promise that finishing is the. best. feeling. I bet you like your quilt top now, and that's great, but when it's quilted and bound you're going to be smitten.
For those taking it slow I'm going to cover making the quilt back today, basting tomorrow, 2 quilting options next week (including Dogwood free motion quilting!) and then binding before we have our finished quilts link party on December 20th. I'm breaking up all the finishing steps into bite-sized pieces.
But, maybe you're hungry for a fast finish? Here are links to previous posts about these crucial finishing steps:
**Spray Basting tutorial
**Straight Line quilting
**Organic Grid quilting
**Dogwood quilting notes
**Binding tutorial
Make your Quilt Backing
The following notes describe how to prepare a backing out of 1 fabric for your Penny Patch quilt. If you prefer to work with scraps or other fabrics, feel free to combine them any way you please to make your backing. Aim for a backing that is about 4" larger in both length and width than your quilt top.
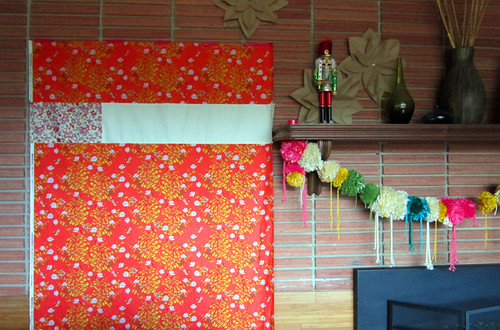
I had a large piece of Briar Rose that wasn't quite big enough, so I added in a strip of Comma periods and a Chicopee floral. I love to make do!
for a Baby Penny Patch (42" x 54")
The supplies list called for a 1 2/3 yard cut for backing. Since your fabric is 44" wide and the quilt top is 42" wide, this fabric is just barely wide enough for your quilt back. A 1 2/3 yard cut is 60" long, allowing for 3" extra at both the top and bottom of the quilt. No piecing required. All done!
for a Throw Penny Patch (60" x 72")
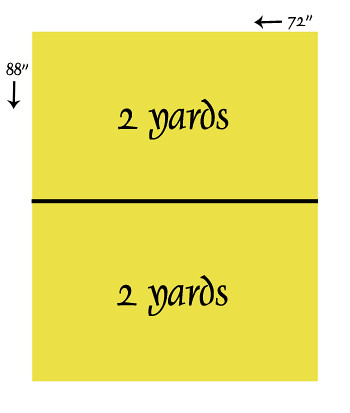
The supplies list called for 4 yards for backing. 4 yards of fabric continuously cut is 144" long. You need to cut the fabric in the middle, creating (2) 2 yard cuts, each 44" x 72".
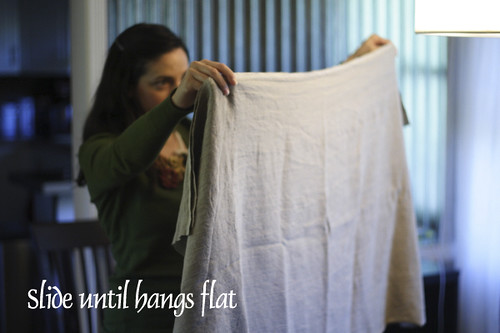
When cutting long pieces, I work in a long hallway and recruit my husband to help. Together we hold the fabric in the air, matching the selvedges and shifting and sliding those selvedges until the fabric hangs flat. Then we carefully place it on the floor, laying it out flat. (For more photos of this process, see this post.) I usually slip a cutting mat under the section I wish to cut, doing my cutting down on the floor so as not to disturb our work.
In this case you want to cut the fabric in half. You can use a long tape measure to find the halfway point. Or, with help, fold the fabric again matching the cut ends. This allows you to easily find center. Cut along the fold, right near the fold to separate the equal 2 yard lengths.
Now that you have 2 pieces, you need to sew them together along the 72" length, creating a 72" x 88" backing.
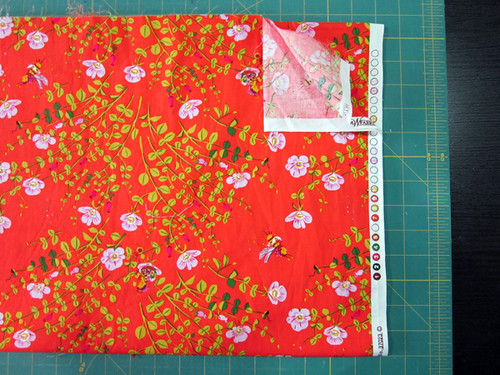
Before sewing, remove selvedges along the 72" length. To do so, fold your large cut of fabric the opposite way from before, so that the cut ends are together (but ragged - not meeting) and the selvedges are folded along the side (meeting evenly, as seen here).
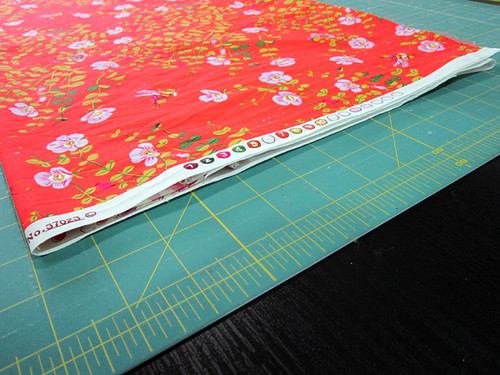
You might have to fold your fabric twice to get it to fit on your cutting mat! Then align the bottom horizontal fold with a line on the cutting mat and cut along a vertical mat line, removing the selvedge.
After removing both seveldges at the future seam, sew the 2 yard cuts together creating a big backing. It is 72" wide, to accommodate your 60" wide throw and 88" long, to accommodate your 72" long throw.
for a Twin Penny Patch (66" x 90")
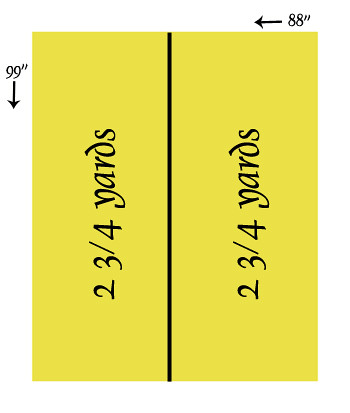
The supplies list called for 5 1/2 yards for backing. Continuously cut, this is 198" long. You need to cut the fabric in the middle, creating 2 cuts, each 44" x 99". Then, you'll remove selvedges and sew those cuts together to create a 88" x 99" backing. This process is exactly like the throw quilt process above, just with longer yardage. Please see directions above.
Notice that your backing is quite a bit wider than necessary. I suggest you do not trim off extra fabric until after basting the quilt.

Does making a backing feel like a chore? You're not alone. This is not usually a favorite part, but the good news is you're getting close to that finish line. Tomorrow we'll baste our backings, batting and quilt tops together and things will start feeling right quilt-y!
Let's finish those quilts! If this is your first quilt, by any chance, I promise that finishing is the. best. feeling. I bet you like your quilt top now, and that's great, but when it's quilted and bound you're going to be smitten.For those taking it slow I'm going to cover making the quilt back today, basting tomorrow, 2 quilting options next week (including Dogwood free motion quilting!) and then binding before we have our finished quilts link party on December 20th. I'm breaking up all the finishing steps into bite-sized pieces.
But, maybe you're hungry for a fast finish? Here are links to previous posts about these crucial finishing steps:
**Spray Basting tutorial
**Straight Line quilting
**Organic Grid quilting
**Dogwood quilting notes
**Binding tutorial
Make your Quilt Backing
The following notes describe how to prepare a backing out of 1 fabric for your Penny Patch quilt. If you prefer to work with scraps or other fabrics, feel free to combine them any way you please to make your backing. Aim for a backing that is about 4" larger in both length and width than your quilt top.
I had a large piece of Briar Rose that wasn't quite big enough, so I added in a strip of Comma periods and a Chicopee floral. I love to make do!
for a Baby Penny Patch (42" x 54")
The supplies list called for a 1 2/3 yard cut for backing. Since your fabric is 44" wide and the quilt top is 42" wide, this fabric is just barely wide enough for your quilt back. A 1 2/3 yard cut is 60" long, allowing for 3" extra at both the top and bottom of the quilt. No piecing required. All done!
for a Throw Penny Patch (60" x 72")
The supplies list called for 4 yards for backing. 4 yards of fabric continuously cut is 144" long. You need to cut the fabric in the middle, creating (2) 2 yard cuts, each 44" x 72".
When cutting long pieces, I work in a long hallway and recruit my husband to help. Together we hold the fabric in the air, matching the selvedges and shifting and sliding those selvedges until the fabric hangs flat. Then we carefully place it on the floor, laying it out flat. (For more photos of this process, see this post.) I usually slip a cutting mat under the section I wish to cut, doing my cutting down on the floor so as not to disturb our work.
In this case you want to cut the fabric in half. You can use a long tape measure to find the halfway point. Or, with help, fold the fabric again matching the cut ends. This allows you to easily find center. Cut along the fold, right near the fold to separate the equal 2 yard lengths.
Now that you have 2 pieces, you need to sew them together along the 72" length, creating a 72" x 88" backing.
Before sewing, remove selvedges along the 72" length. To do so, fold your large cut of fabric the opposite way from before, so that the cut ends are together (but ragged - not meeting) and the selvedges are folded along the side (meeting evenly, as seen here).
You might have to fold your fabric twice to get it to fit on your cutting mat! Then align the bottom horizontal fold with a line on the cutting mat and cut along a vertical mat line, removing the selvedge.
After removing both seveldges at the future seam, sew the 2 yard cuts together creating a big backing. It is 72" wide, to accommodate your 60" wide throw and 88" long, to accommodate your 72" long throw.
for a Twin Penny Patch (66" x 90")
The supplies list called for 5 1/2 yards for backing. Continuously cut, this is 198" long. You need to cut the fabric in the middle, creating 2 cuts, each 44" x 99". Then, you'll remove selvedges and sew those cuts together to create a 88" x 99" backing. This process is exactly like the throw quilt process above, just with longer yardage. Please see directions above.
Notice that your backing is quite a bit wider than necessary. I suggest you do not trim off extra fabric until after basting the quilt.
Does making a backing feel like a chore? You're not alone. This is not usually a favorite part, but the good news is you're getting close to that finish line. Tomorrow we'll baste our backings, batting and quilt tops together and things will start feeling right quilt-y!
