Penny Patch: How to Sew the 4-Penny Patch
This post is part of a series a Beginner’s Quilt-Along. You can join in anytime, even if you’re not a beginner!
Please see this page for links to all posts, and join us on Flickr to share your questions and work-in-progress!
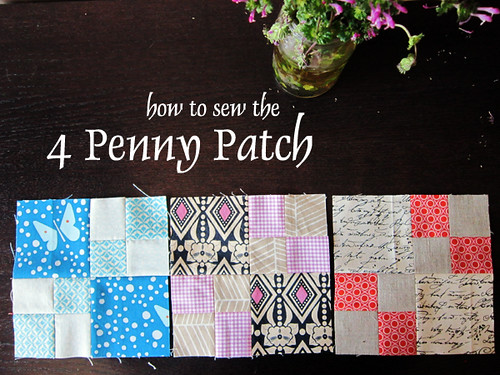
If you've ever wondered where our quilt gets its name... this is it! The tiny little 4-patches in this block are actually bigger than a penny, but still mighty small. Each littlest square finishes at 1.5". The block finishes 6" square, which is 6.5" unfinished (with raw edges still exposed)
Step 1: Fabrics & Cutting
Each block will require three fabrics - a main fabric and two accents. The accent fabrics become the small squares in the tiny 4-patch sections. If you've been following our quilt-along, you've already cut your main fabrics in pairs of 3.5" squares and your accent fabrics as 2" x 22" strips.
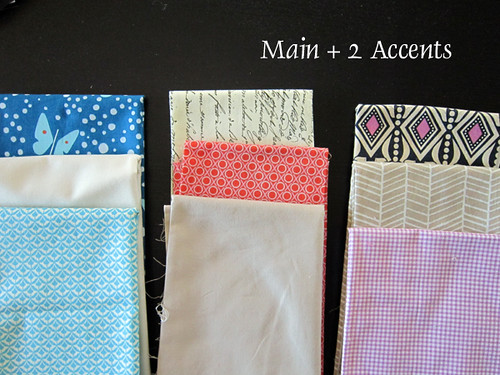
For those working from scraps or strips of any other length, you'll want to know that each 4-penny patch block requires at least (2) 2" x 8" strips, one in each accent fabric. A quick bit of math reveals that each 22" strip has the potential to yield 2 blocks, with a good amount leftover.
Step 2: Piece Accent Strips
Pair up your accent strips in attractive combinations. Do a few that are "color + color," many that are "low volume + low volume" and many that are "low volume + color". Sew each pair of accent strips side-by-side along the long edge, creating a wider fabric strip.
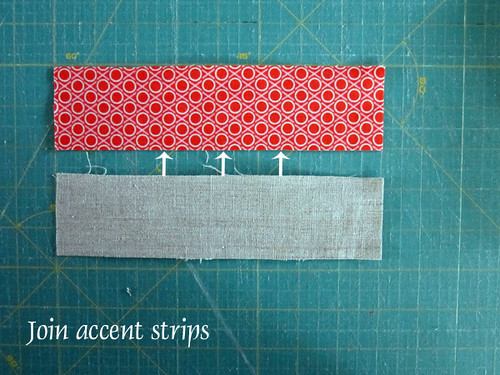
In this above example I am joining 8" long accent strips, which is the minimum length for 1 block. Most of us are working with 22" long accent strips. Either way, the process is the same.
Place the strips so that the right sides of the fabrics are together. The "right side" is the side you like to look at. With solids it can be hard to tell and really isn't a big deal! Your strips are the same width (2") so they will stack exactly on each other with all raw edges matching. When sewing these strips, I don't find pinning necessary. I just hold the edges of the fabrics together as I sew. If you'd like to use pins, be my guest.
Keeping the edges aligned as nicely as possible, sew a 1/4" seam allowance along one long raw edge to join. You don't need your walking foot at this point (though if it is already on your machine, there is no need to take it off). If you don't know how to sew a 1/4" seam on your machine, do some experimenting first. There may be a spot on your machine foot that has a line denoting a 1/4" seam. If not, you can place a piece of colored masking tape on your machine's needle plate that will help you stitch at 1/4" exactly (measure from the needle down position to the side at 1/4").
You do NOT have to backstitch when piecing patchwork. In fact, backstitching will often cause your machine to "eat" the edge of the fabric.
After sewing one pair, stop and press the seam. I prefer to press the seam open, to create flatter works. Now, place your pressed work on a cutting mat and use a clear quilting ruler to measure the width.
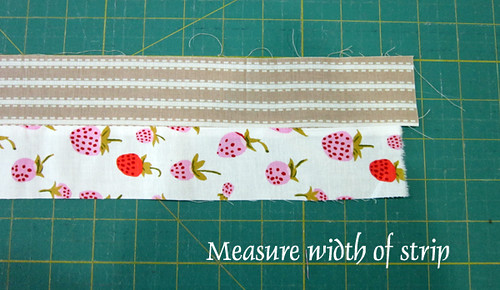
*If your work is less than 3.5" wide you are sewing a too-large seam. Your block will turn out too small. Please unpick your seam and sew again with a slightly narrower seam.
*If you sewed a true 1/4" seam, your work will be 3.5" wide. That's great! Be careful not to sew a more generous seam.
*If you sewed a scant 1/4" seam, your work will measure between 3.5" and 3.75". Ok, we can work with that. Carry on!
*If your work is wider than 3.75", your seams are too scant (too narrow) to be healthy. Please unpick your seam and sew again with a more generous seam. Try to get closer to a true 1/4" seam.
When your 1/4" seam is healthy, you can join all desired accent strip pairs. For efficiency, keep sewing one pair of strips after another, not cutting threads between pairs. Instead, sew a little bit through "nothing" while feeding in a new pair. This is called "chain piecing". It saves thread and time! Don't worry, your machine doesn't mind sewing through "nothing". Doing so creates a tiny thread chain, which you'll snip apart later to disconnect pairs. And remember you don't have to backstitch at all during patchwork. After sewing, press all seams.
Step 3: Create 4-Patches
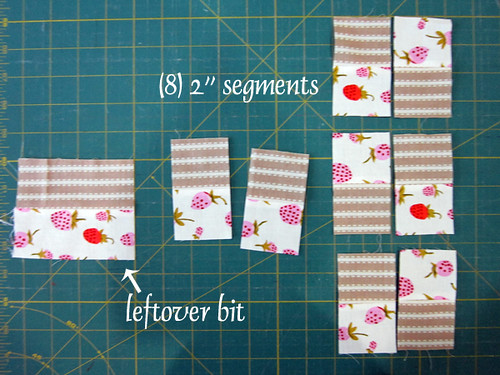
At the cutting mat, cut the accent strip pair into 2" segments. Each block will require (4) identical 2" segments. As you cut, place a horizontal line of the ruler over the seam of the accent pair. This ensures that your cut is perpendicular to that seam.

Whenever cutting fabric with seams, cutting according to the already-sewn seams keeps things square. In general, you can improve your sewing accuracy by sewing and then cutting, when possible. Remember, use your ruler to match the seam line and then cut at 2" wide.
If you are working with 22" strips, cut (8) 2" segments from your strip. About 6" of sewn fabric will be left, which is not enough to yield another block. Instead of slicing the leftover bits, set them aside. Later on you may have enough leftovers to yield another block. Alternatively, you can also unpick the seam on leftovers and sew them in new combinations that will allow you to use some leftovers for more blocks.
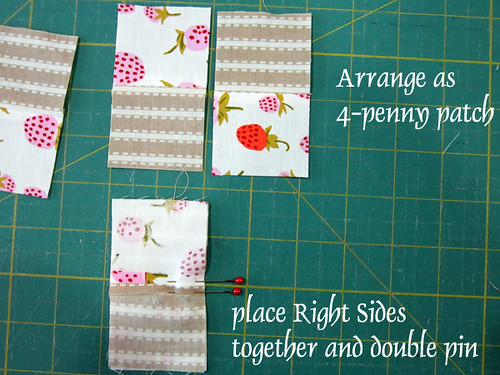
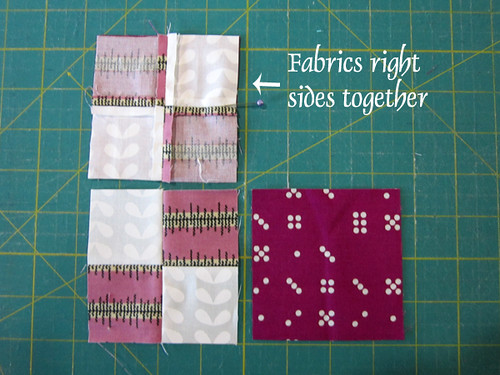
Arrange 2" segments into pairs, with the same-fabrics placed on diagonal. If any fabrics are directional (like stripes) make sure the directional fabrics are going the same way. Place 2" segments right sides together. As you do, make sure to match the seam line at center. Then, place a pin before and after the seam. Always place pins perpendicular to the fabric's raw edge, as shown. This is the best way to stabilize fabrics. Double-pinning make sense anytime you really care about seam matching. If you prefer a more casual approach, you could also try sewing these without pinning. With more experience, pins are not usually necessary on such a short seam.
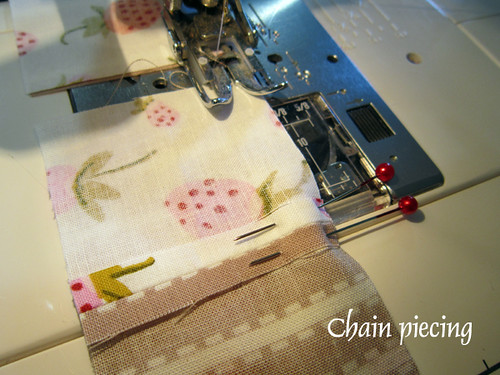
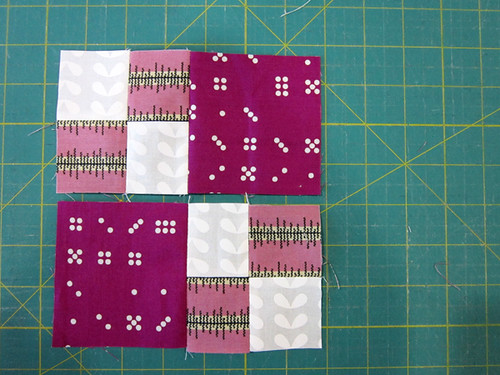
Sew accent strip segments together to make (2) little 4-patch segments per block. Do not sew over pins - remove them just before. Again, aim to sew a true or scant 1/4" seam. You can chain piece again, creating a chain of matched segments.
Cut thread chains and press all patches. After pressing, each tiny 4-patch should measure 3.5" square, or slightly larger. Keep sewing segments until you have (2) identical 4-patches for each 4-penny patch block you'll be making. The baby quilt requires (32) 4-penny patch blocks, the throw requires 60 and the twin requires 84.
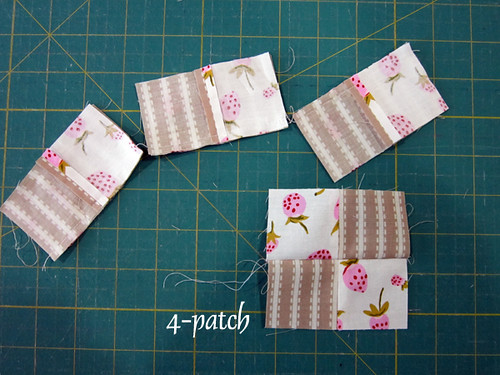
Each 22" strip will yield 4 identical 4-patch blocks which create 2 complete blocks. As you're sewing your blocks in the coming weeks, you can work with as many accent pairs as necessary to yield your block goal for that week. For example, someone sewing a throw quilt would need to work with 10 accent pairs per week.
Step 4: Assemble Block
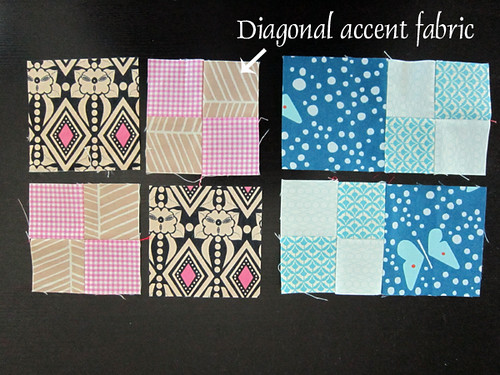
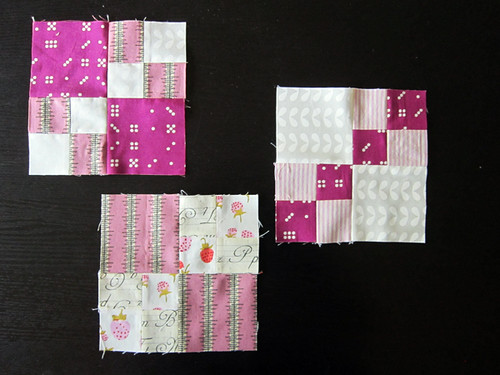
Set out a 4-patch pair with a pair of 3.5" main fabric squares in a checkerboard arrangement. The tiny accent strip squares should be arranged so that one accent fabric forms a diagonal line through the block.
Join each tiny 4-patch to a 3.5" square, creating 2 rows per block. Use a pin if you feel it helps you maintain matched raw edges while feeding the pieces through your sewing machine.
Then, sew rows together to finish.
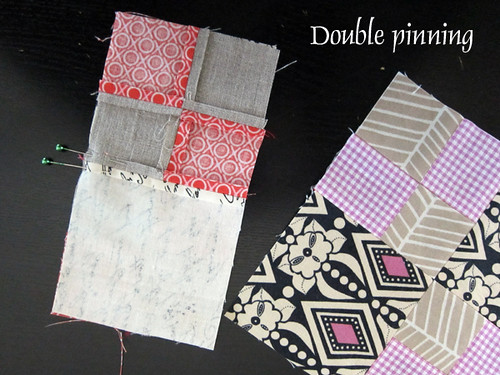
As you join rows, match the seams between the tiny 4-patch and main fabric. Place a pin on each side of that seam. This double-pin method is my favorite way to ensure matched points.
As you arrange the 4-patches with the 3.5" squares, you can choose to keep the darker accent squares all in a row, making one long diagonal through the block. Or, you can allow the lighter fabrics squares to line up, which creates a very different effect. I like to do both and spread out the different styles throughout my quilt for added interest.
Press and measure your block. If you are sewing true 1/4" seams, your block will probably already be 6.5" or thereabouts. If it is a hair smaller in parts, don't sweat it. You can work with that when you join blocks. If you are sewing a scant 1/4" seam, your block will be slightly larger than 6.5". Please trim block to 6.5". A 6.5" square ruler works great for that! If you don't have one, measure and trim at 3.25 from the center seam all the way around.

If you've ever wondered where our quilt gets its name... this is it! The tiny little 4-patches in this block are actually bigger than a penny, but still mighty small. Each littlest square finishes at 1.5". The block finishes 6" square, which is 6.5" unfinished (with raw edges still exposed)
Step 1: Fabrics & Cutting
Each block will require three fabrics - a main fabric and two accents. The accent fabrics become the small squares in the tiny 4-patch sections. If you've been following our quilt-along, you've already cut your main fabrics in pairs of 3.5" squares and your accent fabrics as 2" x 22" strips.
For those working from scraps or strips of any other length, you'll want to know that each 4-penny patch block requires at least (2) 2" x 8" strips, one in each accent fabric. A quick bit of math reveals that each 22" strip has the potential to yield 2 blocks, with a good amount leftover.
Step 2: Piece Accent Strips
Pair up your accent strips in attractive combinations. Do a few that are "color + color," many that are "low volume + low volume" and many that are "low volume + color". Sew each pair of accent strips side-by-side along the long edge, creating a wider fabric strip.
In this above example I am joining 8" long accent strips, which is the minimum length for 1 block. Most of us are working with 22" long accent strips. Either way, the process is the same.
Place the strips so that the right sides of the fabrics are together. The "right side" is the side you like to look at. With solids it can be hard to tell and really isn't a big deal! Your strips are the same width (2") so they will stack exactly on each other with all raw edges matching. When sewing these strips, I don't find pinning necessary. I just hold the edges of the fabrics together as I sew. If you'd like to use pins, be my guest.
Keeping the edges aligned as nicely as possible, sew a 1/4" seam allowance along one long raw edge to join. You don't need your walking foot at this point (though if it is already on your machine, there is no need to take it off). If you don't know how to sew a 1/4" seam on your machine, do some experimenting first. There may be a spot on your machine foot that has a line denoting a 1/4" seam. If not, you can place a piece of colored masking tape on your machine's needle plate that will help you stitch at 1/4" exactly (measure from the needle down position to the side at 1/4").
You do NOT have to backstitch when piecing patchwork. In fact, backstitching will often cause your machine to "eat" the edge of the fabric.
After sewing one pair, stop and press the seam. I prefer to press the seam open, to create flatter works. Now, place your pressed work on a cutting mat and use a clear quilting ruler to measure the width.
*If your work is less than 3.5" wide you are sewing a too-large seam. Your block will turn out too small. Please unpick your seam and sew again with a slightly narrower seam.
*If you sewed a true 1/4" seam, your work will be 3.5" wide. That's great! Be careful not to sew a more generous seam.
*If you sewed a scant 1/4" seam, your work will measure between 3.5" and 3.75". Ok, we can work with that. Carry on!
*If your work is wider than 3.75", your seams are too scant (too narrow) to be healthy. Please unpick your seam and sew again with a more generous seam. Try to get closer to a true 1/4" seam.
When your 1/4" seam is healthy, you can join all desired accent strip pairs. For efficiency, keep sewing one pair of strips after another, not cutting threads between pairs. Instead, sew a little bit through "nothing" while feeding in a new pair. This is called "chain piecing". It saves thread and time! Don't worry, your machine doesn't mind sewing through "nothing". Doing so creates a tiny thread chain, which you'll snip apart later to disconnect pairs. And remember you don't have to backstitch at all during patchwork. After sewing, press all seams.
Step 3: Create 4-Patches
At the cutting mat, cut the accent strip pair into 2" segments. Each block will require (4) identical 2" segments. As you cut, place a horizontal line of the ruler over the seam of the accent pair. This ensures that your cut is perpendicular to that seam.
Whenever cutting fabric with seams, cutting according to the already-sewn seams keeps things square. In general, you can improve your sewing accuracy by sewing and then cutting, when possible. Remember, use your ruler to match the seam line and then cut at 2" wide.
If you are working with 22" strips, cut (8) 2" segments from your strip. About 6" of sewn fabric will be left, which is not enough to yield another block. Instead of slicing the leftover bits, set them aside. Later on you may have enough leftovers to yield another block. Alternatively, you can also unpick the seam on leftovers and sew them in new combinations that will allow you to use some leftovers for more blocks.
Arrange 2" segments into pairs, with the same-fabrics placed on diagonal. If any fabrics are directional (like stripes) make sure the directional fabrics are going the same way. Place 2" segments right sides together. As you do, make sure to match the seam line at center. Then, place a pin before and after the seam. Always place pins perpendicular to the fabric's raw edge, as shown. This is the best way to stabilize fabrics. Double-pinning make sense anytime you really care about seam matching. If you prefer a more casual approach, you could also try sewing these without pinning. With more experience, pins are not usually necessary on such a short seam.
Sew accent strip segments together to make (2) little 4-patch segments per block. Do not sew over pins - remove them just before. Again, aim to sew a true or scant 1/4" seam. You can chain piece again, creating a chain of matched segments.
Cut thread chains and press all patches. After pressing, each tiny 4-patch should measure 3.5" square, or slightly larger. Keep sewing segments until you have (2) identical 4-patches for each 4-penny patch block you'll be making. The baby quilt requires (32) 4-penny patch blocks, the throw requires 60 and the twin requires 84.
Each 22" strip will yield 4 identical 4-patch blocks which create 2 complete blocks. As you're sewing your blocks in the coming weeks, you can work with as many accent pairs as necessary to yield your block goal for that week. For example, someone sewing a throw quilt would need to work with 10 accent pairs per week.
Step 4: Assemble Block
Set out a 4-patch pair with a pair of 3.5" main fabric squares in a checkerboard arrangement. The tiny accent strip squares should be arranged so that one accent fabric forms a diagonal line through the block.
Join each tiny 4-patch to a 3.5" square, creating 2 rows per block. Use a pin if you feel it helps you maintain matched raw edges while feeding the pieces through your sewing machine.
Then, sew rows together to finish.
As you join rows, match the seams between the tiny 4-patch and main fabric. Place a pin on each side of that seam. This double-pin method is my favorite way to ensure matched points.
As you arrange the 4-patches with the 3.5" squares, you can choose to keep the darker accent squares all in a row, making one long diagonal through the block. Or, you can allow the lighter fabrics squares to line up, which creates a very different effect. I like to do both and spread out the different styles throughout my quilt for added interest.
Press and measure your block. If you are sewing true 1/4" seams, your block will probably already be 6.5" or thereabouts. If it is a hair smaller in parts, don't sweat it. You can work with that when you join blocks. If you are sewing a scant 1/4" seam, your block will be slightly larger than 6.5". Please trim block to 6.5". A 6.5" square ruler works great for that! If you don't have one, measure and trim at 3.25 from the center seam all the way around.
