Penny Patch: Quilt Design
This post is part of a series a Beginner’s Quilt-Along. You can join in anytime, even if you’re not a beginner!
Please see this page for links to all posts, and join us on Flickr to share your questions and work-in-progress!
Tomorrow we'll be cutting our fabrics! Those following along range from first-time quilters cutting from new fat quarters to long-time quilters cutting from scraps. It will be helpful for everyone involved to understand the design of this quilt and different ways of composing the 4-penny patch block.

The Penny Patch quilt is so simple. It alternates between 6" finished simple square blocks and 6" finished 4-penny patch blocks. You can make your quilt any size you like by adding more rows or columns, while keeping the pattern going: one simple square, one 4-penny patch, one simple square, etc.
::your quilt design::
If you're making the Baby Quilt, your quilt will have 7 columns and 9 rows. That's what we quilters call a 7 x 9 setting. Since 7 multiplied by 9 is 63, a baby-sized Penny Patch will have 63 blocks. 31 of those blocks will be simple squares and 32 of those blocks will be 4-penny patches. The first row should start with a 4-penny patch.
If you're making the Throw Quilt, your quilt will have 10 columns and 12 rows, what quilters call a 10 x 12 setting. Since 10 multiplied by 12 is 120, a throw-sized Penny Patch will have 120 blocks, 60 of each kind (simple squares and 4-penny patches). Since there is an even amount of simple squares and 4-penny patch blocks in your quilt, your first row can start with either kind.
If you're making the Twin Quilt, your quilt will have 11 columns and 15 rows, a 11 x 15 setting. Since 11 multiplied by 15 is 165, a twin-sized Penny Patch will have 165 blocks. 83 of those blocks will be simple squares and 84 of those blocks will be 4-penny patches. The first row should start with a 4-penny patch.
::your sewing goals::
After cutting fabrics this week, the quilt-along schedule has us spending the following three weeks of November sewing blocks. You only have to sew the number of 4-penny patch blocks required for your quilt. That's because the simple squares just need to be cut, not sewn. We'll be cutting everything this week! So, those making a baby quilt only need to SEW 32 blocks. You could aim to make 10-11 per week. A throw quilt requires you to SEW 60 blocks - 20 per week and a twin requires you to SEW 84 blocks - 28 per week. Of course you can go faster or slower, this is just a suggestion for those who appreciate sew-along goals!
::your color recipe::
Are you planning to follow my "color recipe" for a low-volume quilt with 2 main colors and 1 pop color? As part of our cutting and sewing directions I will guide you in maintaining that color balance. For example, I'll call for a certain count of color A, color B, color C and low volume 4-penny patch blocks. But this is not science - it's art! Please feel so, soooo free to do what looks right to you.
And, even when you do follow the recipe, there is room for interpretation. For example, each of these blocks is a color B (purple) 4-penny patch block for my current work-in-progress:
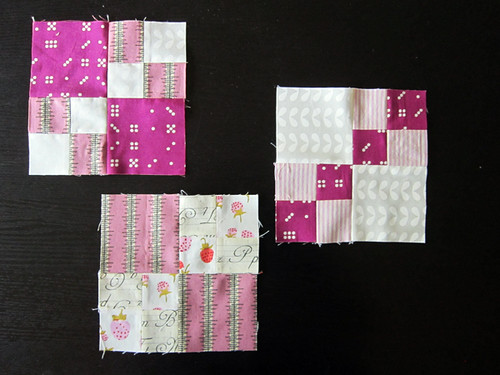
The top block has 3" finished squares and 4-penny patches that all have purple. The bottom one has purple only in the 3" finished squares and the right block has purple only in the 4-penny patches. When I count the number of "color B" 4-penny patch blocks in my work-in-progress these all count! This shows that your quilt can turn out more or less color saturated, depending on how you combine fabrics in these sewn blocks. To provide flexibility, in some cases we'll cut more fabric that absolutely required for your 4-penny patch blocks. Then you'll decide which bits you want to use more of or less of to create the effect you'll love!
I'll be back tomorrow with a detailed cutting post!
Tomorrow we'll be cutting our fabrics! Those following along range from first-time quilters cutting from new fat quarters to long-time quilters cutting from scraps. It will be helpful for everyone involved to understand the design of this quilt and different ways of composing the 4-penny patch block.
The Penny Patch quilt is so simple. It alternates between 6" finished simple square blocks and 6" finished 4-penny patch blocks. You can make your quilt any size you like by adding more rows or columns, while keeping the pattern going: one simple square, one 4-penny patch, one simple square, etc.
::your quilt design::
If you're making the Baby Quilt, your quilt will have 7 columns and 9 rows. That's what we quilters call a 7 x 9 setting. Since 7 multiplied by 9 is 63, a baby-sized Penny Patch will have 63 blocks. 31 of those blocks will be simple squares and 32 of those blocks will be 4-penny patches. The first row should start with a 4-penny patch.
If you're making the Throw Quilt, your quilt will have 10 columns and 12 rows, what quilters call a 10 x 12 setting. Since 10 multiplied by 12 is 120, a throw-sized Penny Patch will have 120 blocks, 60 of each kind (simple squares and 4-penny patches). Since there is an even amount of simple squares and 4-penny patch blocks in your quilt, your first row can start with either kind.
If you're making the Twin Quilt, your quilt will have 11 columns and 15 rows, a 11 x 15 setting. Since 11 multiplied by 15 is 165, a twin-sized Penny Patch will have 165 blocks. 83 of those blocks will be simple squares and 84 of those blocks will be 4-penny patches. The first row should start with a 4-penny patch.
::your sewing goals::
After cutting fabrics this week, the quilt-along schedule has us spending the following three weeks of November sewing blocks. You only have to sew the number of 4-penny patch blocks required for your quilt. That's because the simple squares just need to be cut, not sewn. We'll be cutting everything this week! So, those making a baby quilt only need to SEW 32 blocks. You could aim to make 10-11 per week. A throw quilt requires you to SEW 60 blocks - 20 per week and a twin requires you to SEW 84 blocks - 28 per week. Of course you can go faster or slower, this is just a suggestion for those who appreciate sew-along goals!
::your color recipe::
Are you planning to follow my "color recipe" for a low-volume quilt with 2 main colors and 1 pop color? As part of our cutting and sewing directions I will guide you in maintaining that color balance. For example, I'll call for a certain count of color A, color B, color C and low volume 4-penny patch blocks. But this is not science - it's art! Please feel so, soooo free to do what looks right to you.
And, even when you do follow the recipe, there is room for interpretation. For example, each of these blocks is a color B (purple) 4-penny patch block for my current work-in-progress:
The top block has 3" finished squares and 4-penny patches that all have purple. The bottom one has purple only in the 3" finished squares and the right block has purple only in the 4-penny patches. When I count the number of "color B" 4-penny patch blocks in my work-in-progress these all count! This shows that your quilt can turn out more or less color saturated, depending on how you combine fabrics in these sewn blocks. To provide flexibility, in some cases we'll cut more fabric that absolutely required for your 4-penny patch blocks. Then you'll decide which bits you want to use more of or less of to create the effect you'll love!
I'll be back tomorrow with a detailed cutting post!
