Quilting in an Organic Grid
My friend Debbie from the Faith circle ofdo. Good Stitches, recently sent me this question
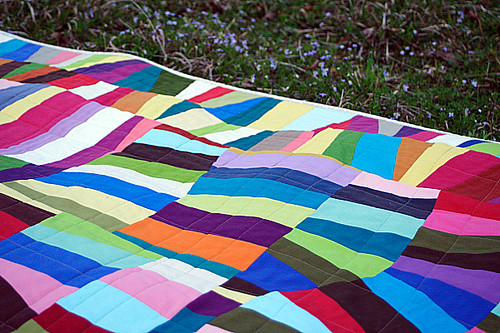
Q: I really like how you did the loose grid quilting on Oodalolly.

Can you tell me how you went about this? Did you do all of the vertical lines and then go back and do the horizontal lines? Also, do you start in the middle and work your way to each outer edge? Do you always quilt from the top to the bottom or from the right to the left
The only time I have done straight line quilting I thought I had the quilt well pinned but it still ended up getting pulled out of shape. I'm thinking it's because I started on the edge and worked from right to left going from top to bottom several times. Then I had the disastrous thought to turn it around and go from bottom to top
A: It's easy when quilting straight lines to gradually drag your quilt to the side, even if you've basted well. To prevent quilting drag, I alternate the traveling direction of my quilting lines andquilt in a loose grid which I later fill in. The loose grid stabilizes the entire quilt to prepare for denser quilting. The denser your quilting, the easier it is to gradually pull the fabrics one way.
If you start on a project making straight lines and always traveling in one direction, say right to left, you may notice the fabric shifting or creating drag puckers around line 3 or 4. At this point, if you turn around and start traveling in the other direction, you will probably create even more noticeable quilting drag as the fabric shifts in the other direction. It's really frustrating, I know! The key is to alternate the direction of travel when quilting those lines every time from the very beginning.
When quilting Oodalolly, first I spray basted with 505 basting spray. I have better results with spray vs. pin basting. I just can't bring myself to put pins every 4 inches. Ugh! I buy 505 at Sew for Less, which has a great price on the large can. The 17 oz can retails for just $13.50! I buy a few at a time to save on shipping costs and they last me for quite awhile. For more of my thoughts about basting spray, check out this post.
Once basted, I quilted down the center of the quilt in a straight-ish line without marking. So, rather than marking a grid, by concept was to quilt "organic" straight lines that wouldn't be exactly straight. After my first line, I quilted another straight line parallel to the first, but spaced about 15" away and traveling in the opposite direction. Next I quilted another line on the other side of the original line, again spaced about 15" away and traveling in the opposite direction as the original line.
After quilting about 3 parallel lines, I began quilting perpendicular lines in the same manner - starting at the center and alternating the direction of travel when quilting. After doing those 3 lines, I rotated the quilt and added more lines to the first set of lines, emanating out to complete the loose grid. To prevent quilting drag, I kept switching up my direction of travel and only quilted 3-4 lines in one orientation before rotating the quilt to make some perpendicular lines.
Once the loose grid was complete (to about 6-8" apart throughout) I added lines without all that alternating and rotating, just until satisfied with the quilting density.
Hope that helps!
I thought this might be helpful to some of you as well. Let me know if you have any questions!
