Behind the Scenes with Stitch Magazine
Have you seen the Fall issue of Stitch Magazine? If you have... maybe, just maybe you noticed a quilt made by moi?

It was my first time published! This week I am finishing up another magazine quilt (insert annoying "hush, hush"). So, I figure this is the perfect time to dish on Alphabet Soup. Today I'll share about the process of working with the magazine. Tomorrow, the actual quilt!
Step 1: Submissions
To be considered for any magazine, you generally find the "submissions" page on the magazine's website. There you can find out what type of material they're searching for and even who to talk to about your ideas. The Stitch Magazine submissions page is updated several times a year with specific info on the themes for the next issue. Once you've worked with Stitch, they also email submissions info to you automatically about 1 month before submissions are due.
I try to put off looking at the Stitch "call for submissions" PDF until I'm really ready to brainstorm ideas. Once I read about the 4 categories they're focusing on and see the color swatches for each category, my brain won't stop dreaming up possibilities. And since I don't know if I'll actually make any of the ideas I'm brewing, it can be kind of distracting from actual projects on hand. The week that submissions are due, I start putting my ideas on paper.
My Alphabet Soup quilt was designed for the category "What's Your Type?" about using type as a central design element. One night over family dinner I sketched out my ideas and where I was getting stuck. Aria suggested suddenly, "Why don't you make an alphabet quilt for Liam!" And, so I did. Here's the description I gave in my submission to Stitch:

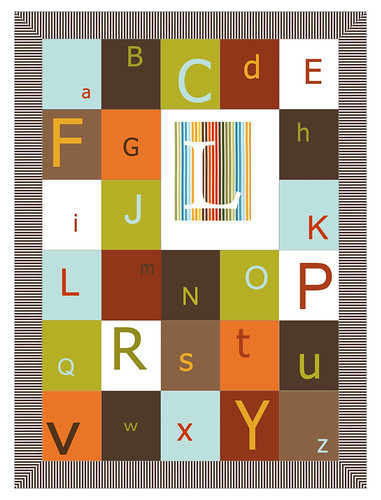
Then followed info on proposed fabrics and this digital mock-up:
I submitted 2 other projects for the Fall 2011 issue, both of which I liked better than the alphabet quilt. But, lo and behold they liked this one. When I heard the news, I was thrilled! And, then I was worried... because I actually had to make it.
Step 2: The Making
Two concerns immediately emerged: 1. Can I finish this quilt in time (a little less than a month and I need to order supplies) and 2. Will my work be up to par? Complicating the first question was another unknown - how long would it take me to write project directions to Stitch Magazine's standards? As you can imagine, I lost no time sourcing supplies! And, you know what, the supplies alone cost over $90. Since projects go for between $200 - $500 with Stitch Magazine, depending on project size, that $90 is a considerable chunk of the pay!
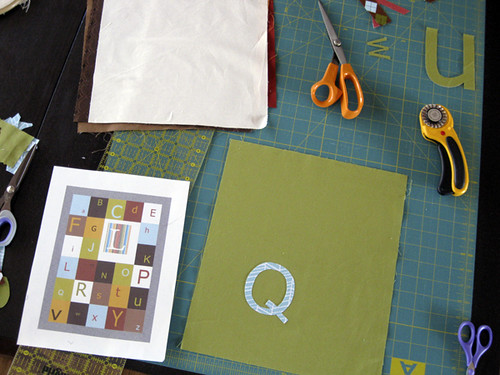
Fortunately, Alphabet Soup is a fairly simple quilt to make. Most of the work comes with creating and attaching the applique letters. Since I used different techniques to give the quilt more character (felt letters, pinked edges, satin stitch edges) there were several sets of directions to write. So as to keep on top of this long project, I typed up directions as I went.

The first time around I forgot to prewash the felt, so all the felt letter blocks had to be redone!

When I got to this point, I sent photos to my contact at Stitch to make sure that things were progressing as expected. And she liked it - yeah!!! This finally quelled that small, but constant worry that they weren't going to like it afterall...


Everything went together pretty smoothly, until finally it. was. done. If you were reading Stitched in Color in February, you may remember my complaining about a very large quilt that was taking up all my time? This would be it. No matter how simple, twin quilts are twin quilts.
Step 3: Waiting
Once I mailed in my quilt, templates and digital directions, what lay before me was a whole lot of waiting. Waiting to see if they would find fault with my work. Waiting to find out if my directions made any sense. Waiting to discover how they would photograph my baby. Waiting to see myself actually in print. Waiting to get paid.
Because, you don't get paid until the magazine is published! In this case, 5 months after I sent in the quilt my project was returned, along with a check and several copies of the Fall issue. In the meantime I had accepted that my quilt must be "good enough" because I was never contacted with any concerns about it or any points of clarification about my directions. This time contributor copies of the magazine were "late", so I got my package almost a month after my friends started getting the magazine. That last month of waiting was definitely the hardest part!
And so that's my story - my "behind the scenes" with Stitch Magazine. In no way should any of it be seen as a criticism. I am very happy with my experience and do hope to contribute to Stitch Magazine again. I included nitty gritty details to give you a fuller picture of what it's like. By far, the biggest drawback was not getting to share the process with you in real time! But, in the end, I did get a check which went right into the savings account for when "no other job" reality hits next year. I hope I'll be ready!
It was my first time published! This week I am finishing up another magazine quilt (insert annoying "hush, hush"). So, I figure this is the perfect time to dish on Alphabet Soup. Today I'll share about the process of working with the magazine. Tomorrow, the actual quilt!
Step 1: Submissions
To be considered for any magazine, you generally find the "submissions" page on the magazine's website. There you can find out what type of material they're searching for and even who to talk to about your ideas. The Stitch Magazine submissions page is updated several times a year with specific info on the themes for the next issue. Once you've worked with Stitch, they also email submissions info to you automatically about 1 month before submissions are due.
I try to put off looking at the Stitch "call for submissions" PDF until I'm really ready to brainstorm ideas. Once I read about the 4 categories they're focusing on and see the color swatches for each category, my brain won't stop dreaming up possibilities. And since I don't know if I'll actually make any of the ideas I'm brewing, it can be kind of distracting from actual projects on hand. The week that submissions are due, I start putting my ideas on paper.
My Alphabet Soup quilt was designed for the category "What's Your Type?" about using type as a central design element. One night over family dinner I sketched out my ideas and where I was getting stuck. Aria suggested suddenly, "Why don't you make an alphabet quilt for Liam!" And, so I did. Here's the description I gave in my submission to Stitch:
The Modern Alphabet Quilt – A twin bed quilt, easily customized for girl or boy. The first letter of the child's name features prominently, on a large striped patch.
Each small rectangle block holds one letter of the alphabet (26 small blocks total, each 11 x 13”). Letters are appliqued via three different techniques: pinked edges machine applied, straight cut edges (backed with fusible interfacing) satin machine stitch applied and wool felt letters hand stitched with pearl cotton. Letters vary uppercase/lowercase and in positions on blocks as well.
Use of color – blocks are solids (or almost solids) with print letters. The white patch around the central stripe patch features the owl print (see picture below). A simple striped 5” border frame. Twin quilt measures 65 x 88”.
Then followed info on proposed fabrics and this digital mock-up:
I submitted 2 other projects for the Fall 2011 issue, both of which I liked better than the alphabet quilt. But, lo and behold they liked this one. When I heard the news, I was thrilled! And, then I was worried... because I actually had to make it.
Step 2: The Making
Two concerns immediately emerged: 1. Can I finish this quilt in time (a little less than a month and I need to order supplies) and 2. Will my work be up to par? Complicating the first question was another unknown - how long would it take me to write project directions to Stitch Magazine's standards? As you can imagine, I lost no time sourcing supplies! And, you know what, the supplies alone cost over $90. Since projects go for between $200 - $500 with Stitch Magazine, depending on project size, that $90 is a considerable chunk of the pay!
Fortunately, Alphabet Soup is a fairly simple quilt to make. Most of the work comes with creating and attaching the applique letters. Since I used different techniques to give the quilt more character (felt letters, pinked edges, satin stitch edges) there were several sets of directions to write. So as to keep on top of this long project, I typed up directions as I went.
The first time around I forgot to prewash the felt, so all the felt letter blocks had to be redone!
When I got to this point, I sent photos to my contact at Stitch to make sure that things were progressing as expected. And she liked it - yeah!!! This finally quelled that small, but constant worry that they weren't going to like it afterall...
Everything went together pretty smoothly, until finally it. was. done. If you were reading Stitched in Color in February, you may remember my complaining about a very large quilt that was taking up all my time? This would be it. No matter how simple, twin quilts are twin quilts.
Step 3: Waiting
Once I mailed in my quilt, templates and digital directions, what lay before me was a whole lot of waiting. Waiting to see if they would find fault with my work. Waiting to find out if my directions made any sense. Waiting to discover how they would photograph my baby. Waiting to see myself actually in print. Waiting to get paid.
Because, you don't get paid until the magazine is published! In this case, 5 months after I sent in the quilt my project was returned, along with a check and several copies of the Fall issue. In the meantime I had accepted that my quilt must be "good enough" because I was never contacted with any concerns about it or any points of clarification about my directions. This time contributor copies of the magazine were "late", so I got my package almost a month after my friends started getting the magazine. That last month of waiting was definitely the hardest part!
And so that's my story - my "behind the scenes" with Stitch Magazine. In no way should any of it be seen as a criticism. I am very happy with my experience and do hope to contribute to Stitch Magazine again. I included nitty gritty details to give you a fuller picture of what it's like. By far, the biggest drawback was not getting to share the process with you in real time! But, in the end, I did get a check which went right into the savings account for when "no other job" reality hits next year. I hope I'll be ready!
