Taking Pictures - Lighting, Perspective, Background & Camera
One of my dear readers suggested I post some tips for taking good pictures. First off, I'm flattered! I'm glad my pictures generally qualify as "good." Second, I should divulge that my husband is a professional photographer. So, that means that here and there I'm cheating (thanks, Brandon!) and all other times my approach is larger shaped by his pointers over the years.
I feel like I'm going out on a limb here, because *I* am by no means a professional. Also, I'll be making generalizations, which always have exceptions. Nevertheless, here we go...
Tips for Photographing Your Fabulous Craftiness
~lighting
The single most crucial factor in taking a nice picture is lighting. Natural lighting over harsh flash can take a picture from "ugh" to "aaah!". No joke. So, never use flash. NEVER. If at all possible wait to take pictures of your work during the day.
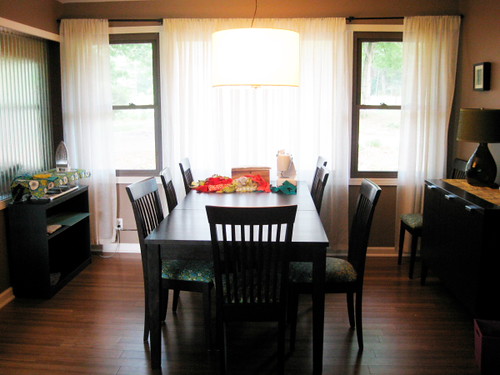
Look for a spot with soft, diffused natural light. Diffused means indirect, as in coming through semi-sheer curtains or bouncing off other walls. If the sun is shining through a bare window directly on your coffee table, photographing an item on that very table may cause it to be "overexposed". That's when the brightness kind of drowns your item in white so that you can't see all the details. Direct light also creates lots of shadows which tend to highlight every single imperfection. An that's no fun. However, a spot on the floor a few feet outside of the direct path of sunlight may be perfect. As you've seen, I shoot a lot of my work on my kitchen table, which is beside a large picture window covered with white, semi-sheer curtains.
But what if you really must take a picture at night? Still, DON'T use flash! Turn on however many regular house lights you need/have and go with that lighting. If your picture comes out semi-dark, it'll be easier to fix that than to deal with the nasty flat appearance of flashed pictures.
~perspective
What angle? How close? Mostly you'll find your best perspectives through trial an error. So, take lots of pictures! I rarely take just one shot, even if I really like that first one. Try getting closer. Then, get closer still. Try shooting it from the side, all slanty-like. Many square/rectangle things like quilt blocks and quilts actually look more interesting when shot at angle or with the frame tilted so that the work is "turned" rather than square within the rectangle frame of the view finder.

When you shoot pretty close (like 2 feet or less away) check to see if your camera has a close or "macro" setting. My simple point and shoot does, and it makes a big difference in the amount of detail and sharpness that is captures. My "close" setting is marked by a picture of a flower, as opposed to a tree. I use this when I shoot fabric stacks, for example.
~ background
Generally, less is more here. My favorite pictures tend to be on white backgrounds with simple textures like paneling or on wood backgrounds like hardwood floors or my table. Don't allow anything in the picture that doesn't contribute to your image, like a random electric cord or that pile of laundry. Sometimes I like to allow the mess from my sewing table show in pictures, because in those cases my pin cushion, that pile of fabric or even my cutting board somehow add to the image, in my opinion. Reflective backgrounds like tile, mirrors or windows are generally distracting.

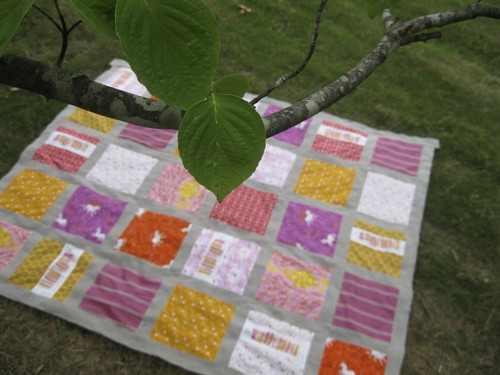
What about shooting large items, like quilts. Ugh! I feel your pain. Try having someone hold the quilt vertically. I tend to like that better than pictures laying flat, plus it's easier to get a good perspective. I love quilt pictures where the quilt is hanging from something in the distance, perhaps higher up. I've seen this done from porches, docks, trees and clotheslines. I've been known to climb a tree to photograph a large tree alone from above. It worked, but be careful!
If you have a two-story, you might try photographing a quilt above from the landing. Oh, and always try photographing them folded too. I love those folded edges!
~camera
Um, so I just use a point and shoot. Course my husband has nicer cameras, but I don't "know" how to use them. Occasionally I ask him to set one up for a particular photograph, but I don't know squat about doing that myself. I do want to learn - I can totally tell a difference in picture quality! He says I have to sit down with him and take notes, like all serious and everything. And, I'm supposed to choose that over sewing? Someday.
Until then, I use my camera on "auto". As mentioned, I turn off flash, use the "close" setting as appropriate and work hard to hold the camera very, very still. When possible, I brace myself by sitting, kneeling or holding onto furniture to minimize camera shake.
And doubtless, because I shoot on "auto" I do plenty of post-production work.
Say what? Post-production?
Oh, yes! That's where it's at! I'll be back next time with tips for improving your pictures after the fact.
I feel like I'm going out on a limb here, because *I* am by no means a professional. Also, I'll be making generalizations, which always have exceptions. Nevertheless, here we go...
Tips for Photographing Your Fabulous Craftiness
~lighting
The single most crucial factor in taking a nice picture is lighting. Natural lighting over harsh flash can take a picture from "ugh" to "aaah!". No joke. So, never use flash. NEVER. If at all possible wait to take pictures of your work during the day.
Look for a spot with soft, diffused natural light. Diffused means indirect, as in coming through semi-sheer curtains or bouncing off other walls. If the sun is shining through a bare window directly on your coffee table, photographing an item on that very table may cause it to be "overexposed". That's when the brightness kind of drowns your item in white so that you can't see all the details. Direct light also creates lots of shadows which tend to highlight every single imperfection. An that's no fun. However, a spot on the floor a few feet outside of the direct path of sunlight may be perfect. As you've seen, I shoot a lot of my work on my kitchen table, which is beside a large picture window covered with white, semi-sheer curtains.
But what if you really must take a picture at night? Still, DON'T use flash! Turn on however many regular house lights you need/have and go with that lighting. If your picture comes out semi-dark, it'll be easier to fix that than to deal with the nasty flat appearance of flashed pictures.
~perspective
What angle? How close? Mostly you'll find your best perspectives through trial an error. So, take lots of pictures! I rarely take just one shot, even if I really like that first one. Try getting closer. Then, get closer still. Try shooting it from the side, all slanty-like. Many square/rectangle things like quilt blocks and quilts actually look more interesting when shot at angle or with the frame tilted so that the work is "turned" rather than square within the rectangle frame of the view finder.
When you shoot pretty close (like 2 feet or less away) check to see if your camera has a close or "macro" setting. My simple point and shoot does, and it makes a big difference in the amount of detail and sharpness that is captures. My "close" setting is marked by a picture of a flower, as opposed to a tree. I use this when I shoot fabric stacks, for example.
~ background
Generally, less is more here. My favorite pictures tend to be on white backgrounds with simple textures like paneling or on wood backgrounds like hardwood floors or my table. Don't allow anything in the picture that doesn't contribute to your image, like a random electric cord or that pile of laundry. Sometimes I like to allow the mess from my sewing table show in pictures, because in those cases my pin cushion, that pile of fabric or even my cutting board somehow add to the image, in my opinion. Reflective backgrounds like tile, mirrors or windows are generally distracting.
What about shooting large items, like quilts. Ugh! I feel your pain. Try having someone hold the quilt vertically. I tend to like that better than pictures laying flat, plus it's easier to get a good perspective. I love quilt pictures where the quilt is hanging from something in the distance, perhaps higher up. I've seen this done from porches, docks, trees and clotheslines. I've been known to climb a tree to photograph a large tree alone from above. It worked, but be careful!
If you have a two-story, you might try photographing a quilt above from the landing. Oh, and always try photographing them folded too. I love those folded edges!
~camera
Um, so I just use a point and shoot. Course my husband has nicer cameras, but I don't "know" how to use them. Occasionally I ask him to set one up for a particular photograph, but I don't know squat about doing that myself. I do want to learn - I can totally tell a difference in picture quality! He says I have to sit down with him and take notes, like all serious and everything. And, I'm supposed to choose that over sewing? Someday.
Until then, I use my camera on "auto". As mentioned, I turn off flash, use the "close" setting as appropriate and work hard to hold the camera very, very still. When possible, I brace myself by sitting, kneeling or holding onto furniture to minimize camera shake.
And doubtless, because I shoot on "auto" I do plenty of post-production work.
Say what? Post-production?
Oh, yes! That's where it's at! I'll be back next time with tips for improving your pictures after the fact.