Zigzag Pillowcase Tutorial

Hey, lookie here - I have a tutorial for you! I'm only flying by the seat of my pants, but you can have it. Pillowcases are so easy, you don't need much, right?
The fate of my project was determined by the size of my scraps. For starters, I only knew that I wanted to trim the pillowcase with a zigzag made with half-square triangles. I also new that the finished pillowcase should measure roughly 14.5 x 19.5".
Note: I made a child's pillowcase made to fit this organic shredded rubber pillow. I love these for my kids because they're chemical-free and machine washable! You'll definitely need to modify this tutorial to fit your pillows. But, don't worry, I'll help you with that!
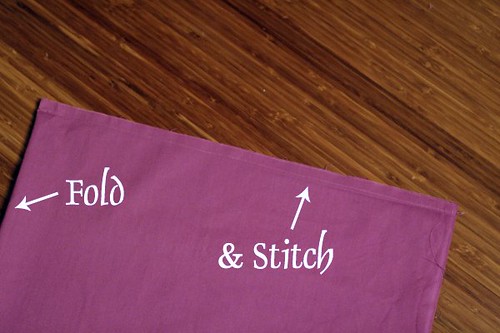
My take on pillowcase design is a long rectangle folded in half and stitched along 2 edges. Here's a rough mock-up. There are probably lots of cool ways of making a pillowcase, but I decided not to investigate and to just go with the obvious. I wasn't in a pattern kind of mood!
Step 1: Converting this Pattern
Measure an existing pillowcase to determine desired finished width and length. And, now some quick calculations:
Your Cutting Width = Desired width plus 2 inches. My desired width is 14.5", so my cutting width is 16.5".
Your Cutting Length = Desired length x 2, then subtract 8 inches to account for the edging. My desired width was 19.5". 19.5 x 2 = 39. Then, 39 - 8 = 31. My cutting length is 31".
Step 2: Cutting
Out of your solid fabric, cut one rectangle that measures your cutting width by cutting length. For this pillowcase I cut a rectangle of the violet solid at 16.5 x 31".
For the zigzag strip, cut 5" squares from a variety of prints. I used seven different prints, so I cut seven 5" squares and then cut each of my squares in half on the diagonal to produce 2 triangles per square. I ended up needing 10 half square triangles to make the trim for this small pillowcase. Simply keep cutting half square triangles until you have enough to make 2 strips that are the length of your cutting width (16.5 in my case).
Last, cut 2 long strips at your cutting width x 2.5" for the folded edging (2 strips at 16.5 x 2.5 in my case). I only had enough white wildflower meadow fabric to edge one side, so I used the golden wildflower meadow for the other. The folded edging would also look nice in the same main solid used for the body of the pillowcase.
Step 3: Triangle Piecing
Arrange and rearrange your half square triangles until you find an order you love. Then, piece one to another, being sure to overlap them slightly to preserve a 1/4" seam allowance. Notice how I've overlapped the triangles for piecing:

The little "dog ears" must stick out like this so that the edges line up after you have pieced them together with a 1/4" seam. Sew each triangle together with right sides facing. Press seams open. Keep piecing until you have 2 strips, each measuring the length of your cutting width.

Step 4: Attach Zigzag Trim
Now we'll attach the zigzag edge trims to your large, solid rectangle. Pin a zigzag strip to a short edge of your rectangle. Pin with right sides together every 2.5 inches. When you piece this part together, you are sewing along the stretchy bias of your triangles. It is important to use many pins to help minimize stretching. Ideally, use a walking foot on your sewing machine to help feed the fabric evenly. Attach the zigzag strip with a 1/4" seam and press seams open. Repeat on the other short edge of your rectangle. Trim the zigzag strips so that their edges are flush with your rectangle. Now the zigzag trim looks like an extension of your rectangle - great!
Step 5: Attach Folded Edging
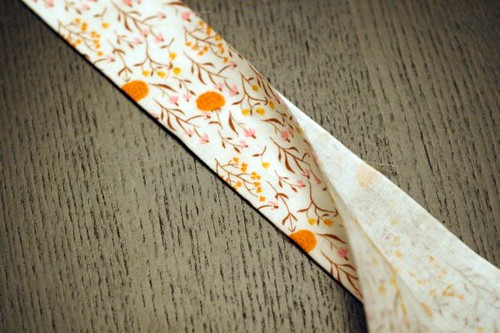
Fold the long thin folded edging piece in half longways. Press.

Align the two raw edges of the folded edging with the raw edge of the zigzag trim. You will have 3 raw edges total aligned in one spot. Make sure you are pinning it to the right side of the zigzag! Again, pin about every 2.5" to minimize stretching. Attach with a 1/4" seam. Press open. You should now have edges that look like this:

Step 6: Finish!
You now have one looooong piece of fabric. Fold it in half perfectly with right sides together so that it's finally in a pillowcase-like shape.
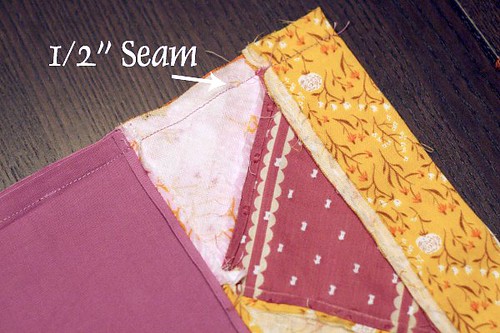
Take care to align the folded edging trim just right. Press the pillowcase in the folded position. Pin the top and bottom long sides. Stitch a 1/2" seam from the pressed fold all the way to the folded edging.
Press seams open. Turn right side out and adore!

I made this pillowcase as a birthday surprise for Aria. This is my favorite side. Since my prints were directional, to show this side the opening must lie on the left side of the pillow. Fortunately, that works for us! Keep directional prints in mind when you are choosing which side of your zigzag strip to attach to your solid rectangle.

And here's the other side. The solid fabric I used is from my local big-box fabric store, but it approximates Kona violet. My triangles are a mixture of Far Far Away by Heather Ross and some Little Folks by Anna Maria Horner.

Doesn't it look so cute!?! When Aria opened here present, she exclaimed "My own fabric for my sewing box" and set the little package in her new sewing basket. I had to unwrap the little bundle to show her that it was actually a completed project. I guess it does look a bit like the fabric stacks I get in the mail from Etsy. But, yikes, don't cut it up!
Poor girl, she needs some fabric. Christmas is coming - apparently fabric is on both of our lists!
