Colorbrick: How to Spray Baste Your Quilt
This post is part of a series {Colorbrick} a Beginner’s Quilt-Along. You can join in anytime, even if you’re not a beginner! Please see this page for links to all posts, and join us on Flickr to share your questions and work-in-progress!
For quilters, basting is when you take your finished quilt top, quilt back and batting and make a "quilt sandwich" with your batting in the middle. The goal is to smoothly connect all layers so that you can quilt (as in stitching through all 3 layers) them together without things shifting about as you go. There are many ways to baste a quilt. This is just what works best for me (largely because it is faster). If you prefer to pin baste, check out this tutorial at Red Pepper Quilts. For a comparison of pin basting and spray basting, see this post.
Get Ready
To baste you will need your quilt top, a backing that measures approximately 2 inches bigger than your quilt top on all sides, and a batting that is bigger than your quilt top, but smaller than your quilt back. No need to be precise about the batting and backing measurements, as you will trim them to match the quilt top exactly when we're done quilting.
Other supplies: masking tape, spray adhesive made for quilting (I'm happy with the Dritz brand, though others recommend the 505 Fix & Spray), clothesline/clothespins or large flat sheet.
It is not healthy to breathe the spray adhesive, so do not use this product around young children and take extra care if you are pregnant. In an ideal world, you would use it outside only. Today I used the clothesline method, which was suggested by one of my readers, specifically so that I could keep the spray out of my house. If you do not have a clothesline, you could spray baste flat on your porch or inside on your floor with windows open. I will outline that process at the end of this tutorial.
No matter which method you use, aim to hold the can about 12 inches from the fabric as you spray lightly and evenly, moving your arm from side to side in large sweeping motions. How much to spray? Think of this like spraying hairspray. You don't want to wet the fabric. You want just enough to make it tacky. It should feel tacky on the fabric when you touch it, but it may not stick together like crazy, even though you used enough product. I've heard that using too much could cause your needles to gum up. Don't forget to shake the can well before spraying.
Step 1: Iron
A smooth, unwrinkled quilt top and backing will make basting easier, no matter what method you use to baste your quilt. Take the time to iron out those fold lines!
Step 2: Spray the Backing

Hang your quilt back on your clothesline. Spray the wrong side of your backing (if you can figure out the wrong side!) with spray adhesive. I was able to carry this inside all by myself by folding the right sides of the backing together so that the tacky sides remain facing out.
Step 3: Tape Down the Backing

Back inside your house, lay out your quilt back on a smooth, flat surface with the right side down and the tacky side up. Tape all the way around the edges with masking tape. As you go make sure that the quilt back is laying flat and taut, but not stretched. Pulling it just a little to make it taut is a good idea.
Step 4: Lay Out the Batting

Fold your batting into quarters so that it's easier to manipulate (or, if you have help, skip the folding and request assistance). Place the batting on one corner of your quilt back with the folds towards the center of the quilt. Unfold carefully, being sure that all batting remains on your quilt back and keeping everything nice and straight. If you find you've gone wrong somewhere, go ahead and lift up your batting to reposition it. Your spray adhesive should allow for easy repositioning, but you should feel a light pull as you peel the batting away from the backing. Adjust until your batting lies smooth.

Step 5: Spray the Quilt Top
Hang your quilt top on your clothesline. Spray the wrong side with spray adhesive.

Again, fold it with right sides touching and remove from clothesline. Carry it inside, keeping it folded.
Step 6: Lay Out the Quilt Top
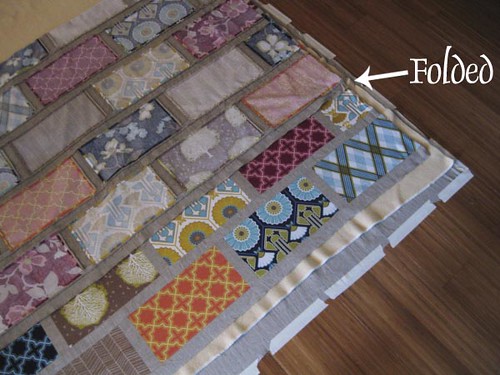
Lay your folded quilt top on the batting with the wrong side/tacky side down. Once you have half of the quilt positioned well, unfold it carefully. Spread and reposition until it lies smooth and straight. Look at your quilt from the side to check that the long sashing strips are straight. If they're a little off, just pull and nudge things into place. Last of all, run your hands over the quilt, with some pressure, to make sure that the adhesive is coming into firm contact with the fabric throughout.
If everything is going well, your quilt is now spray basted! All 3 layers should be stuck together so that they act like one piece. If you find things aren't sticking you probably didn't use enough spray adhesive. You could spray a little more on spots that need it, watching out for overspray and being thoughtful of any little ones in the house. Alternatively, you could use basting pins to secure spots that aren't sticking well. With practice you will learn to apply the spray adhesive just right the first time around!
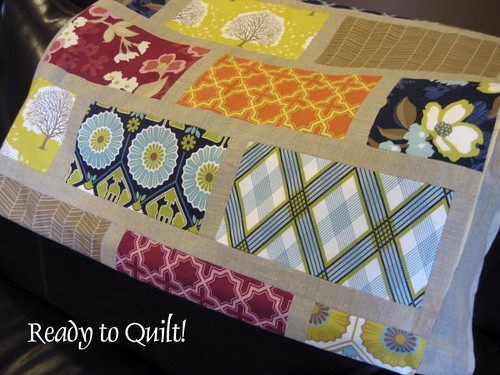
Now you can fold and set aside your quilt - it's ready to be quilted!!!
How to Spray Baste on the Floor
If you're working inside, you want to protect your floor from adhesive overspray. If you're working outside on a porch, you want to protect your quilt from any dirt. Either way you need a smooth flat surface to baste. Lay a spare sheet out and tape it down all the way around with masking tape. When you're done basting, you can wash the sheet to remove any spray adhesive.
Now, lay out your quilt back very smoothly with the wrong side up. Tape all the way around the edges with masking tape, securing the quilt back to your sheet. As you go make sure that the quilt back is laying flat and taut, but not stretched.
Next position your batting on the quilt back. Get it smooth and perfectly in place. Then, fold it in half to reveal half of your quilt back underneath.
Spray the adhesive on the quilt back, evenly and lightly. Unfold the batting, which should easily go back to it's perfectly placed position.
Repeat on the other side - fold in half, spray and unfold. Your quilt back and batting should now be adhered and laying flat ready for the quilt top.
Now lay out your quilt top on top of the batting with the right side of the quilt top up. Tug and position until everything is lined up just so. When you're happy with the position, fold the quilt top in half.
Spray the batting that is revealed. Unfold the quilt top and smooth it out.
Repeat, folding the opposite side of the quilt top which has not yet been adhered. Spray the batting and unfold.
Give the entire quilt a nice smoothing, making sure that all layers have made firm contact throughout. Your quilt is basted!
Questions? Suggestions? Please post them here!
Happy basting =)
For quilters, basting is when you take your finished quilt top, quilt back and batting and make a "quilt sandwich" with your batting in the middle. The goal is to smoothly connect all layers so that you can quilt (as in stitching through all 3 layers) them together without things shifting about as you go. There are many ways to baste a quilt. This is just what works best for me (largely because it is faster). If you prefer to pin baste, check out this tutorial at Red Pepper Quilts. For a comparison of pin basting and spray basting, see this post.
Get Ready
To baste you will need your quilt top, a backing that measures approximately 2 inches bigger than your quilt top on all sides, and a batting that is bigger than your quilt top, but smaller than your quilt back. No need to be precise about the batting and backing measurements, as you will trim them to match the quilt top exactly when we're done quilting.
Other supplies: masking tape, spray adhesive made for quilting (I'm happy with the Dritz brand, though others recommend the 505 Fix & Spray), clothesline/clothespins or large flat sheet.
It is not healthy to breathe the spray adhesive, so do not use this product around young children and take extra care if you are pregnant. In an ideal world, you would use it outside only. Today I used the clothesline method, which was suggested by one of my readers, specifically so that I could keep the spray out of my house. If you do not have a clothesline, you could spray baste flat on your porch or inside on your floor with windows open. I will outline that process at the end of this tutorial.
No matter which method you use, aim to hold the can about 12 inches from the fabric as you spray lightly and evenly, moving your arm from side to side in large sweeping motions. How much to spray? Think of this like spraying hairspray. You don't want to wet the fabric. You want just enough to make it tacky. It should feel tacky on the fabric when you touch it, but it may not stick together like crazy, even though you used enough product. I've heard that using too much could cause your needles to gum up. Don't forget to shake the can well before spraying.
Step 1: Iron
A smooth, unwrinkled quilt top and backing will make basting easier, no matter what method you use to baste your quilt. Take the time to iron out those fold lines!
Step 2: Spray the Backing
Hang your quilt back on your clothesline. Spray the wrong side of your backing (if you can figure out the wrong side!) with spray adhesive. I was able to carry this inside all by myself by folding the right sides of the backing together so that the tacky sides remain facing out.
Step 3: Tape Down the Backing
Back inside your house, lay out your quilt back on a smooth, flat surface with the right side down and the tacky side up. Tape all the way around the edges with masking tape. As you go make sure that the quilt back is laying flat and taut, but not stretched. Pulling it just a little to make it taut is a good idea.
Step 4: Lay Out the Batting
Fold your batting into quarters so that it's easier to manipulate (or, if you have help, skip the folding and request assistance). Place the batting on one corner of your quilt back with the folds towards the center of the quilt. Unfold carefully, being sure that all batting remains on your quilt back and keeping everything nice and straight. If you find you've gone wrong somewhere, go ahead and lift up your batting to reposition it. Your spray adhesive should allow for easy repositioning, but you should feel a light pull as you peel the batting away from the backing. Adjust until your batting lies smooth.
Step 5: Spray the Quilt Top
Hang your quilt top on your clothesline. Spray the wrong side with spray adhesive.
Again, fold it with right sides touching and remove from clothesline. Carry it inside, keeping it folded.
Step 6: Lay Out the Quilt Top
Lay your folded quilt top on the batting with the wrong side/tacky side down. Once you have half of the quilt positioned well, unfold it carefully. Spread and reposition until it lies smooth and straight. Look at your quilt from the side to check that the long sashing strips are straight. If they're a little off, just pull and nudge things into place. Last of all, run your hands over the quilt, with some pressure, to make sure that the adhesive is coming into firm contact with the fabric throughout.
If everything is going well, your quilt is now spray basted! All 3 layers should be stuck together so that they act like one piece. If you find things aren't sticking you probably didn't use enough spray adhesive. You could spray a little more on spots that need it, watching out for overspray and being thoughtful of any little ones in the house. Alternatively, you could use basting pins to secure spots that aren't sticking well. With practice you will learn to apply the spray adhesive just right the first time around!
Now you can fold and set aside your quilt - it's ready to be quilted!!!
How to Spray Baste on the Floor
If you're working inside, you want to protect your floor from adhesive overspray. If you're working outside on a porch, you want to protect your quilt from any dirt. Either way you need a smooth flat surface to baste. Lay a spare sheet out and tape it down all the way around with masking tape. When you're done basting, you can wash the sheet to remove any spray adhesive.
Now, lay out your quilt back very smoothly with the wrong side up. Tape all the way around the edges with masking tape, securing the quilt back to your sheet. As you go make sure that the quilt back is laying flat and taut, but not stretched.
Next position your batting on the quilt back. Get it smooth and perfectly in place. Then, fold it in half to reveal half of your quilt back underneath.
Spray the adhesive on the quilt back, evenly and lightly. Unfold the batting, which should easily go back to it's perfectly placed position.
Repeat on the other side - fold in half, spray and unfold. Your quilt back and batting should now be adhered and laying flat ready for the quilt top.
Now lay out your quilt top on top of the batting with the right side of the quilt top up. Tug and position until everything is lined up just so. When you're happy with the position, fold the quilt top in half.
Spray the batting that is revealed. Unfold the quilt top and smooth it out.
Repeat, folding the opposite side of the quilt top which has not yet been adhered. Spray the batting and unfold.
Give the entire quilt a nice smoothing, making sure that all layers have made firm contact throughout. Your quilt is basted!
Questions? Suggestions? Please post them here!
Happy basting =)
