Colorbrick: Cutting! Fat Quarters become Bricks
This post is part of a series {Colorbrick} a Beginner’s Quilt-Along. You can join in anytime, even if you’re not a beginner! Please see this page for links to all posts, and join us on Flickr to share your questions and work-in-progress!
I'm so excited that it's time to start cutting! You'll be cutting 6 bricks from each fat quarter. If you're using 10 fat quarters, that'll make 60 bricks, but you only need 55 for the quilt. You'll have 5 extra! So, don't worry overmuch if you make a mistake or two. Perhaps start by cutting your least favorite fabric!

Here is our cutting diagram, which assumes that your washed and pressed fat quarter measures approximately 18 x 21 inches. You need 16.5 x 20" of usable fabric. So, on the 18" side you have wiggle room. On the 21" side you need to be careful to not waste fabric when you're trimming the edges to make a straight edge.
Each finished brick will measure 10 x 5.5 inches. Be sure to orient your fat quarter as shown in the cutting diagram, since you can't get two 10" cuts from the 18" side. Note the position of the selvedge when working with each fat quarter. It will always be on an 18" side.
I will be demonstrating on a 18 x 12" cutting mat. Cutting on this small mat is slightly more difficult than cutting on a large mat because an entire fat quarter won't fit on the mat. So, I will show you how to fold your fabric to make it fit. If you have a large enough mat, don't fold your fabric. Just lay out your fabric flat on the mat, and plan to cut all 6 bricks without moving your fabric, by simply rotating your mat.
I am right handed. If you are left-handed, you will be cutting with your left hand and will have to mirror what I am demonstrating.
Step 1: Fold & Position

Our first cut will create a 10" wide strip. Begin by folding your fabric in half as shown. Check that your fold line is straight through your print, if your print is directional. You'll see that I did not align my selvedges. Instead, I made sure my fold went through the same part of the pattern all the way across.

Align your fold with a horizontal line on the cutting mat. (If your fabric is not folded, align the bottom straight edge with a horizontal line.) Next, slide it to the left until your left edge is at or just crossing over a vertical line.
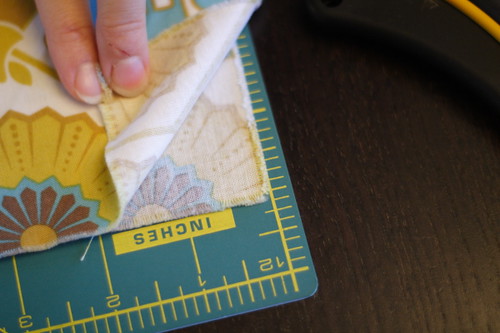
Check that the underlayer of fabric is also reaching or just crossing that left vertical line on the cutting mat.
Step 2: Cut at 10 inches
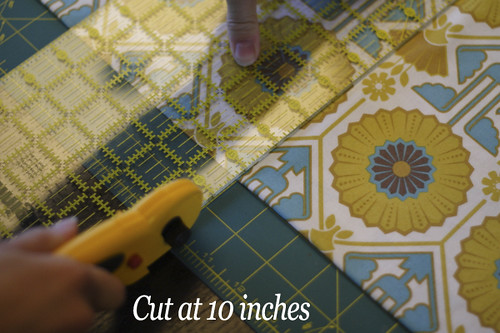
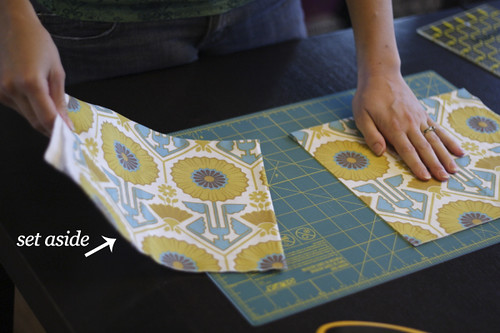
Make a cut at 10 inches to the right, creating a 10" strip. Before moving your ruler, check that you've made a clean cut! If you're cutting with folded fabric on a small mat, set aside the fabric that remains to the right of your cut. We'll keep working with this first 10" strip.
(If you're NOT folding your fabric, leave the fabric in place. Make another cut 10" farther to the right, so that you've made two 10" strips.)
Step 3: Rotating
What is currently the left side of your 10" strip needs trimming for a perfectly straight edge. So, let's rotate the cutting mat 180 degrees in order to be able to trim that edge. By rotating, you are able to keep the "good" fabric under the ruler during your cut, which protects it from getting damaged in case your cut goes wrong (ie, you allow the rotary cutter to slip).

Keep one hand on the fabric as you rotate the cutting mat with the other hand. Be careful not to move the fabric, so that you don't have to realign anything.
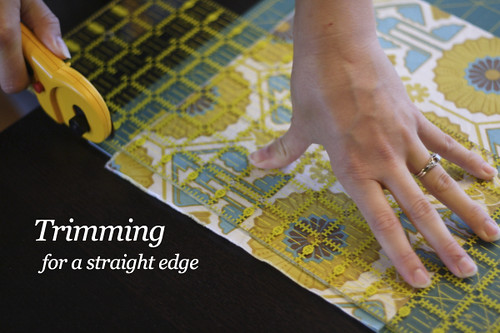
Step 4: Trimming for a Straight Edge
Now trim off that uneven edge. Be sure to maintain your 10" width!
Step 5: Unfold & Reposition
You now have a beautiful 10" strip! Unfold it and lay it flat on the mat. Position the strip with the longest side (the 18" side) aligned with a horizontal line on your cutting mat.

(If you're cutting on a large mat without folding, you obviously don't have to unfold anything! Don't move your fabric, just rotate your cutting mat 90 degrees so that the 18" length of your fat quarter is horizontal.)
Step 6: Trimming for a Straight Edge
Begin cutting all the way to the right of your piece. Trim the right edge along a vertical line to make a straight edge.

Step 7: Cut at 5.5 inches
Make your first brick by cutting at 5.5" to the left of your trimmed edge. Since you're cutting at a 1/2 inch mark, you will not have a vertical line with which to match the cutting edge of your ruler. First find the 5.5" point by noting the measurements at the top and bottom of your cutting mat. Place your ruler. Now, match the nearest vertical line under your clear ruler with the dashed lines printed on the ruler itself to make sure that your ruler is straight.

You should now have a brick measuring 10 x 5.5 inches. (If you are working with a large mat, you will be cutting 2 bricks at once, since you have left all of your fabric in place on the cutting mat.)
Step 8: Cut Again
Measure 5.5" more to the left and cut again, creating another brick.

Step 9: And Again
Measure 5.5" more to the left and cut again, creating yet another brick.

If you are working with a small mat, as shown, you will now have cut 3 bricks. Locate your other 10" strip that was set aside earlier and follow these directions to cut it into 3 more 10 x 5.5" bricks.
If you are working with a large mat, you are done! Just 9 more fat quarters to go...
Questions? Please post them here. I'll be answering any questions with a reply in the comments so that everyone can benefit from the discussion. Let the rotary cutters roll!
I'm so excited that it's time to start cutting! You'll be cutting 6 bricks from each fat quarter. If you're using 10 fat quarters, that'll make 60 bricks, but you only need 55 for the quilt. You'll have 5 extra! So, don't worry overmuch if you make a mistake or two. Perhaps start by cutting your least favorite fabric!
Here is our cutting diagram, which assumes that your washed and pressed fat quarter measures approximately 18 x 21 inches. You need 16.5 x 20" of usable fabric. So, on the 18" side you have wiggle room. On the 21" side you need to be careful to not waste fabric when you're trimming the edges to make a straight edge.
Each finished brick will measure 10 x 5.5 inches. Be sure to orient your fat quarter as shown in the cutting diagram, since you can't get two 10" cuts from the 18" side. Note the position of the selvedge when working with each fat quarter. It will always be on an 18" side.
I will be demonstrating on a 18 x 12" cutting mat. Cutting on this small mat is slightly more difficult than cutting on a large mat because an entire fat quarter won't fit on the mat. So, I will show you how to fold your fabric to make it fit. If you have a large enough mat, don't fold your fabric. Just lay out your fabric flat on the mat, and plan to cut all 6 bricks without moving your fabric, by simply rotating your mat.
I am right handed. If you are left-handed, you will be cutting with your left hand and will have to mirror what I am demonstrating.
Step 1: Fold & Position
Our first cut will create a 10" wide strip. Begin by folding your fabric in half as shown. Check that your fold line is straight through your print, if your print is directional. You'll see that I did not align my selvedges. Instead, I made sure my fold went through the same part of the pattern all the way across.
Align your fold with a horizontal line on the cutting mat. (If your fabric is not folded, align the bottom straight edge with a horizontal line.) Next, slide it to the left until your left edge is at or just crossing over a vertical line.
Check that the underlayer of fabric is also reaching or just crossing that left vertical line on the cutting mat.
Step 2: Cut at 10 inches
Make a cut at 10 inches to the right, creating a 10" strip. Before moving your ruler, check that you've made a clean cut! If you're cutting with folded fabric on a small mat, set aside the fabric that remains to the right of your cut. We'll keep working with this first 10" strip.
(If you're NOT folding your fabric, leave the fabric in place. Make another cut 10" farther to the right, so that you've made two 10" strips.)
Step 3: Rotating
What is currently the left side of your 10" strip needs trimming for a perfectly straight edge. So, let's rotate the cutting mat 180 degrees in order to be able to trim that edge. By rotating, you are able to keep the "good" fabric under the ruler during your cut, which protects it from getting damaged in case your cut goes wrong (ie, you allow the rotary cutter to slip).
Keep one hand on the fabric as you rotate the cutting mat with the other hand. Be careful not to move the fabric, so that you don't have to realign anything.
Step 4: Trimming for a Straight Edge
Now trim off that uneven edge. Be sure to maintain your 10" width!
Step 5: Unfold & Reposition
You now have a beautiful 10" strip! Unfold it and lay it flat on the mat. Position the strip with the longest side (the 18" side) aligned with a horizontal line on your cutting mat.
(If you're cutting on a large mat without folding, you obviously don't have to unfold anything! Don't move your fabric, just rotate your cutting mat 90 degrees so that the 18" length of your fat quarter is horizontal.)
Step 6: Trimming for a Straight Edge
Begin cutting all the way to the right of your piece. Trim the right edge along a vertical line to make a straight edge.
Step 7: Cut at 5.5 inches
Make your first brick by cutting at 5.5" to the left of your trimmed edge. Since you're cutting at a 1/2 inch mark, you will not have a vertical line with which to match the cutting edge of your ruler. First find the 5.5" point by noting the measurements at the top and bottom of your cutting mat. Place your ruler. Now, match the nearest vertical line under your clear ruler with the dashed lines printed on the ruler itself to make sure that your ruler is straight.
You should now have a brick measuring 10 x 5.5 inches. (If you are working with a large mat, you will be cutting 2 bricks at once, since you have left all of your fabric in place on the cutting mat.)
Step 8: Cut Again
Measure 5.5" more to the left and cut again, creating another brick.
Step 9: And Again
Measure 5.5" more to the left and cut again, creating yet another brick.
If you are working with a small mat, as shown, you will now have cut 3 bricks. Locate your other 10" strip that was set aside earlier and follow these directions to cut it into 3 more 10 x 5.5" bricks.
If you are working with a large mat, you are done! Just 9 more fat quarters to go...
Questions? Please post them here. I'll be answering any questions with a reply in the comments so that everyone can benefit from the discussion. Let the rotary cutters roll!
