Work in Progress – Colorbrick Quilt & Tutorial
When I started sewing last summer, I said I wouldn't be making quilts. I didn't like quilts, and my husband hated the look. That was before I came across the modern quilt aesthetic exemplified by bloggers such as Film in the Fridge. Oh, I'm hooked. Waaaaaaay hooked. My husband still hates the look.
Yesterday I finished sewing the quilt top of my very first quilt. It is a brick-like design, inspired by this quilt by Film in the Fridge. I used my adored Good Folks fabrics by Anna Maria Horner, which I've already used to make a chair pad, make-up roll and my patchwork rugs. To create the brick design, each block has natural linen trim on 2 sides. Here are my finished bricks.

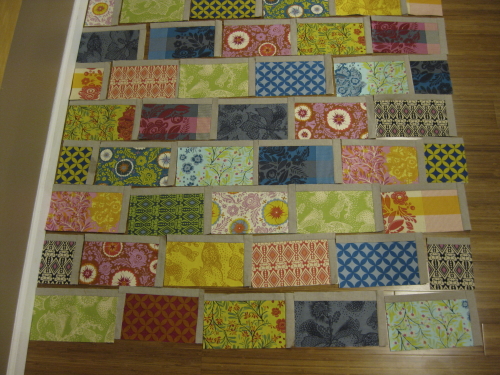
They were easy enough to make, since I used the paper piecing method which I'll explain a bit below. But, when laid out they look like this, with the linen becoming the "mortar" of the colorbricks:
Last night I sewed the backing, chose a yellow binding and some variegated yellow/golden orange thread for quilting. I can't wait to make my quilt sandwich and start the finishing process this weekend!
For those of you who sew, you may be interested in a little paper piecing tutorial. Film in the Fridge has a great tutorial for strip-quilting with the paper piecing method. I adapted it to make these brick blocks.
First choose a lightweight paper and cut it to the desired shape of your finished blocks. I used old phonebook paper that was already about the right size. I only had to trim one side of the pages to match my quilting concept and used a rotary mat and cutter to assure 90 degree corners. Now cut your fabrics for the blocks. Next glue the first fabric with a touch of a glue stick to a paper piece to stabilize it.

Pin your next fabric to the first fabric with right sides together. Pin through both the fabric and the paper being careful to align the edges. In this case, I pinned the natural linen to the Good Folks cut. There was no reason for me to trim the linen to size in advance, as you'll see later.

Now, sew those two fabrics together right through the paper, using a smaller stitch length than normal. I used 1.5 length stitches. Close stitches will make removing the paper easy when it's time. Press seam open. Next pin on your next fabric piece. Here I added the second section of linen trim.

Sew, press seam open. Now your block just needs trimming. This is when paper piecing pays off. Flip it over to trim all edges from the back, using the absolutely square paper piece to get it easily square. Quick and very satisfying!

Make all of your blocks like so and leave the paper piecing on until you're ready to sew the quilt top together. When it's time, the paper rips right off because it is perforated from the small stitch length. Some people use muslin fabric instead of paper as the foundation so that they don't have to remove anything. I found removing the paper quite easy and fast. My 5 year old enjoyed helping! Plus, this paper was free and already mostly cut to size.
The main benefit of paper piecing is the ease and accuracy of getting each quilt block square. When I sewed together my quilt top, it went together just right. Paper piecing also makes it easy to see if your fabrics will cover the remaining space without measuring or precutting. In my case, it made it easy to use up every little linen strip on hand.
Yesterday I finished sewing the quilt top of my very first quilt. It is a brick-like design, inspired by this quilt by Film in the Fridge. I used my adored Good Folks fabrics by Anna Maria Horner, which I've already used to make a chair pad, make-up roll and my patchwork rugs. To create the brick design, each block has natural linen trim on 2 sides. Here are my finished bricks.
They were easy enough to make, since I used the paper piecing method which I'll explain a bit below. But, when laid out they look like this, with the linen becoming the "mortar" of the colorbricks:
Last night I sewed the backing, chose a yellow binding and some variegated yellow/golden orange thread for quilting. I can't wait to make my quilt sandwich and start the finishing process this weekend!
For those of you who sew, you may be interested in a little paper piecing tutorial. Film in the Fridge has a great tutorial for strip-quilting with the paper piecing method. I adapted it to make these brick blocks.
First choose a lightweight paper and cut it to the desired shape of your finished blocks. I used old phonebook paper that was already about the right size. I only had to trim one side of the pages to match my quilting concept and used a rotary mat and cutter to assure 90 degree corners. Now cut your fabrics for the blocks. Next glue the first fabric with a touch of a glue stick to a paper piece to stabilize it.
Pin your next fabric to the first fabric with right sides together. Pin through both the fabric and the paper being careful to align the edges. In this case, I pinned the natural linen to the Good Folks cut. There was no reason for me to trim the linen to size in advance, as you'll see later.
Now, sew those two fabrics together right through the paper, using a smaller stitch length than normal. I used 1.5 length stitches. Close stitches will make removing the paper easy when it's time. Press seam open. Next pin on your next fabric piece. Here I added the second section of linen trim.
Sew, press seam open. Now your block just needs trimming. This is when paper piecing pays off. Flip it over to trim all edges from the back, using the absolutely square paper piece to get it easily square. Quick and very satisfying!
Make all of your blocks like so and leave the paper piecing on until you're ready to sew the quilt top together. When it's time, the paper rips right off because it is perforated from the small stitch length. Some people use muslin fabric instead of paper as the foundation so that they don't have to remove anything. I found removing the paper quite easy and fast. My 5 year old enjoyed helping! Plus, this paper was free and already mostly cut to size.
The main benefit of paper piecing is the ease and accuracy of getting each quilt block square. When I sewed together my quilt top, it went together just right. Paper piecing also makes it easy to see if your fabrics will cover the remaining space without measuring or precutting. In my case, it made it easy to use up every little linen strip on hand.
