Planning your Lotus Quilt!
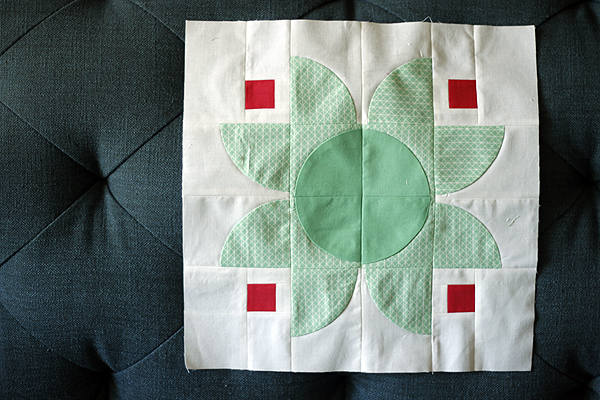
I made my second Lotus block today in a different value pattern. This time the circle in the center of the block is dark and the rest of the flower is lighter, with the background lighter still.

I was inspired to try this value layout after studying this picture (source) of a real lotus flower. So lovely! I enjoy both value patterns, my original and this more literal version. A mix of both will make my quilt more interesting. The literal version seems more peaceful and uncluttered, nice for my simpler fabrics. I'll use the other value layout (the orange block) for my "wow" prints.
How happy I am to hear that so many of you will plan to take advantage of my free Lotus tutorial! There's no better news from a maker's perspective. So, let's proceed.
::Design::
Lotus block is a 12" finished block. You can make 9 blocks, for a baby quilt, or as many more as suits your desired finished quilt size. A nice throw quilt would sew up with 30 blocks in a 5 x 6 setting, finishing about 60" x 72".
For my baby quilt, I'll probably add a 3-4" border around my 3 x 3 block setting to "float" the Lotus blocks serenely in some negative space. As you consider your block count and finished quilt size, realize that a border contributes significantly to the finished size. For example, you could opt for just 20 blocks in a 4 x 5 setting with a 4" border. With this recipe the quilt would finish at 56" x 68", a modest-sized throw. Easily add inches with a slightly bigger border!
::Fabrics::
This fabric recipe is based on cutting pieces with the Accuquilt 3.5" finished drunkard's path die. If you will be cutting pieces by hand, using the template I'll provide, you will need slightly less fabric. The difference is so slight that you can purchase fabrics as necessary based on this recipe.
for one Lotus Block
Circle: (4) 3.5" squares
Surround: (2) 4.5" x 8.5"
Petals: (8) 3.5" squares
Squares: (4) 1.5" squares
Background: 6.5" WOF strip (6.5" x 42")
But, wait
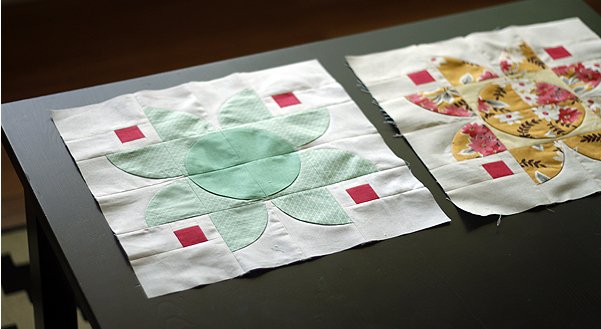
For example, in the green block above, I used the same fabric for the surround and petal elements (Netorious in Jam Jar). In the orange block on the right, I used the same fabric for the circle and petal elements.
In both cases you will need a fat eighth of fabric per block, whether doing the petal/surround combo OR the circle/petal combo! If you are purchasing fabric in fat quarters, you should expect to be able to use a fat quarter of the same feature fabric (like the orange/pink Flea Market Fancy print) for TWO lotus blocks total.
Let's look at how much to purchase for some of the other elements. In my quilt, all of the little squares in all blocks will be the same Kona Watermelon solid. These squares are so tiny that a fat quarter yields more than enough squares for 30 blocks!
The only block element that requires larger cuts of fabric is your background. One block uses most of a 6.5" WOF cut. Therefore, to buy enough background for 9 blocks, a 1.5 yard cut will just do. For 20 blocks, buy 3 yards. For 30 blocks, 4.5 yards. If you can spare, always buy a little extra background for mistakes and for other projects! You may also like to mix different backgrounds together. I am combining Kona White and Kona Oyster so far, since I like to use different backgrounds to create depth.
Planning to add a border? Calculate yardage by factoring your desired border width and quilt size before borders are added. My 3 x 3 baby quilt will be 36.5" square without borders. For a 3.5" border I'll need (2) 4" x 36.5" strips and (2) 4" x 43.5". I'll need (4) WOF cuts to create those borders, which is 16" of fabric = about a 1/2 yard. For the 20 block, 4 x 5 layout, I would buy a 2 yard continuous cut for the borders and cut the fabric longways (not WOF) to create very long, continuous border strips on all sides. You will have extra fabric left over, but no seams in your borders!
I hope that gets you started with planning your quilt and buying fabrics as needed. I like to feel my way with these things, so I will not actually decide upon a border until I've made most of my blocks and can use them to test out some options. Who knows, I may end up making a pieced border (complimentary low volume print + white background) to help a print from my stash find it's way into this quilt. We shall see!
