Clambake: Technique Buffet

Last week we started the Clambake Quilt Along with an initial planning meeting. Hopefully you've been thinking over the size of your project, how you might cut/sew clams and did some fabric brainstorming. If you missed that post, catch up here!
Today we'll take a closer look at the many ways to sew clamshells.
We're focusing on turned-under edge finishes. If I miss your favorite method, please link us in the comments! How will you bake your clams?
Hand Sewing Techniques
If you are interested in hand sewing your clams, please see Molly Flanders excellent post about her experiments with different methods!
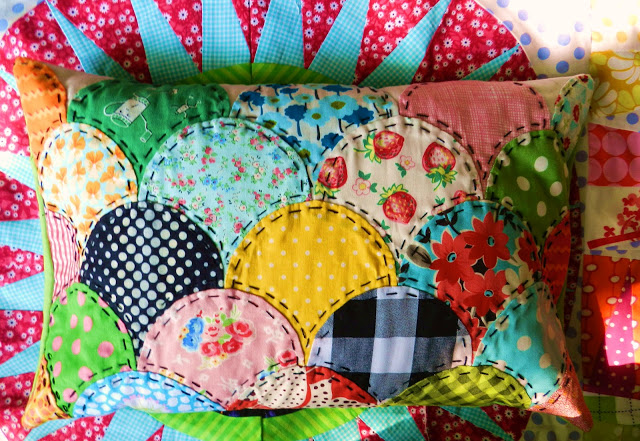
hand applique clams by Molly Flanders
Hand Applique
Likely the most popular hand sewing technique for clamshells is hand applique. In this method, you would press the large curved edge of the clam under by 1/4" to create a turned edge. Then, working in rows, you would hand sew clams to previous rows, sewing along the top curve of each clam. When sewing by hand, you can reasonably applique without a foundation fabric, though using a foundation will be easier. Remember, because of the way that new clamshell rows overlap previous rows, you only need to applique the top curved edge of each clamshell. This will be slow, meditative work. Works well with any size clam.
Tutorial: Molly Flanders
English Paper Piecing
For this method, you would purchase clamshell papers like these. Before sewing, you would turn under all raw edges (all the way around the clam and its point) by folding the fabric around the paper and then baste fabric temporarily to the paper. Once clams are basted, you join by hand, navigating all those curves and points. Last of all, remove the papers. If this sounds tricky, it is. I do not recommend this method to anyone new to English Paper Piecing (EPP), as the clamshell shape is one of the more difficult shapes to EPP. However, if you are familiar with EPP this could be a comfortable method. Works well with any size clam.
Tutorial: Molly Flanders
Machine Sewing Techniques
Machine Piecing from Clams
Traditional machine piecing begins with cutting out clams. Then clamshells are sewn together, right sides together, shifting fabrics to align curves as you sew. This requires an intermediate skill with sewing curves or an advanced level if your clams are 5" or smaller. Accurate cutting is important, as is sewing with a consistent 1/4" seam allowance. You'll want to use pins, even if you often avoid pins for your curved sewing. An advantage is that machine piecing does not require pressing under of raw edges. Best for larger clams.
Free Patterns: Latifah Saafir
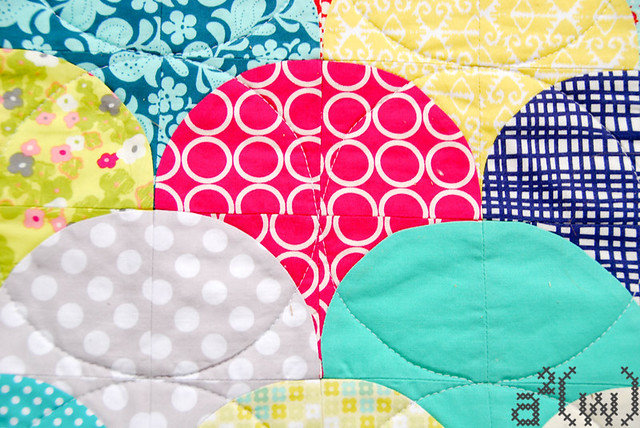
machine pieced clams by Ali Winston
Machine Piecing from Drunkard's Path Block
This variation on machine piecing makes clamshells from drunkard's path blocks. Because drunkard's path is easier to piece than whole clam shapes, this method is appropriate for a confident beginner at sewing curves. If you study the work by Ali Winston above, you can see that each clam is formed by 4 drunkard's path blocks. The seams in the clams are a downside. Advantages: no need to press under raw edges and you may already have drunkard's path cutting dies or templates that could be used. Best for larger clams, since each clamshell is composed of several blocks.
Tutorial: Ali Winston
Machine Applique (traditional)
Machine applique is like hand applique, but the shapes are sewn down with a visible machine stitch that runs along the large curved edge of each clam. First you turn and press under the raw edge along the top curve of each clam, then applique clams working in rows with subsequent rows overlapping previous rows. You could use a decorative stitch, like a blanket stitch, to make the visible applique stitch a design feature rather than a drawback. With machine applique, using a foundation fabric is a must. Works well for any size clam.
I was not able to find a tutorial for this technique. If you know of a good one, please let me know! If you're interested, but unable to proceed without a tutorial, I suggest you consider the next option, which I will be demonstrating in this quilt along!
Machine Applique (quilt as you go)
This variation takes advantage of the applique step, so that the applique process simultaneously quilts the work. This method is no more time consuming and no more difficult than traditional machine applique. You will not need an extra foundation fabric, since we'll be using the batting/backing as our foundation. Works well for any size clam. I will be teaching this method during Clambake quilt along, starting with an overview of the method this Friday.
Cutting Resources
In case you are eager to cut clams, here are some resources!
Printable template for 4" finished clams
Selection of acrylic templates in many clam sizes
More Clambake coming soon!
