Sawtooth Stars tutorial
Once each month I get together with some local friends to sew. Usually we make a quick, easy project, but this month we are working on something all together - a sawtooth star quilt to be gifted to a local single mom and her children.
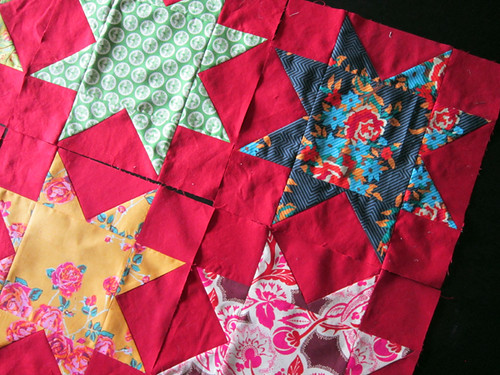
There's something so joyful about these projects. Collaborating to bless another is surely the best kind of feeling! But, as anyone who's worked to assemble a bee quilt or other collaborative work knows, it can be quite the challenge to combine blocks from many sets of hands. Our sewing circle has all levels of patchwork experience too (including none), so I was trying to find an easy, but inspiring quilt block.
In the end it's Sawtooth Stars. This is not the easiest quilt block, since it has points and a fair number of many pieces, but its charm is universal. I've done all the cutting ahead of time, so the ladies can focus on sewing and pressing. I also cut certain pieces large on purpose, so that I'll be able to trim the blocks to size without coming up scant. And I've decided to expect mostly dull points on the outer star points. Slightly dull star tips really don't matter if you don't let them!
::Sawtooth Star Tutorial::
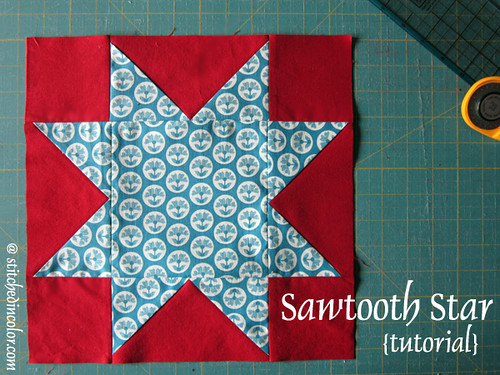
This tutorial is designed for a beginner quilter. It requires the use of one special ruler, the the Fons & Porter Flying Geese Ruler which is my favorite way to cut and sew flying geese units. Each sawtooth star has 4 flying geese units. The tutorial yields a 12" finished quilt block.
Step 1: Cutting
from Background Fabric
Cut (4) 3.75" squares
Cut a 3.5" x width of fabric (WOF) strip. Use the Fons and Porter ruler to cut (4) elongated geese triangles. (Note: each 44" WOF strip can yield 2 blocks.)

from Star Fabric
Cut (1) 6.5" square
Cut a 4" x WOF strip OR cut (2) 4" x 10" pieces. With strip still folded wrong sides together or with 4" x 10" pieces stacked wrong sides together, use the Fons and Porter ruler to cut (8) short side triangles. Since you are cutting layered fabrics, wrong sides together, your triangles will be mirror images - just what you need.

Step 2: Sew Flying Geese Units
First lay out all pieces as shown:
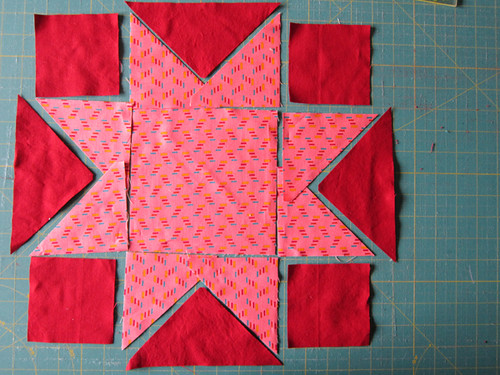
Notice that the blunt corners of the side triangles are placed near the 6.5" square.
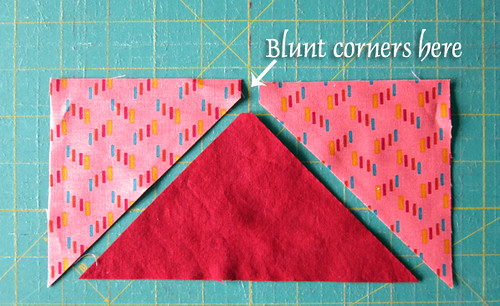
Now separate the flying geese unit like so, keeping the blunt corners of the side triangles up near the peak of the elongated geese triangle.
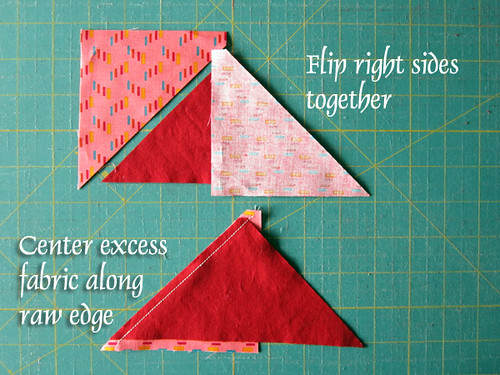
Flip one side triangle so that it is right sides together with the geese triangle. The side triangle is longer along this raw edge than the geese triangle, to make for easier sewing. Roughly center the side triangle's excess fabric along the raw edge. Then, sew with a 1/4" seam allowance.
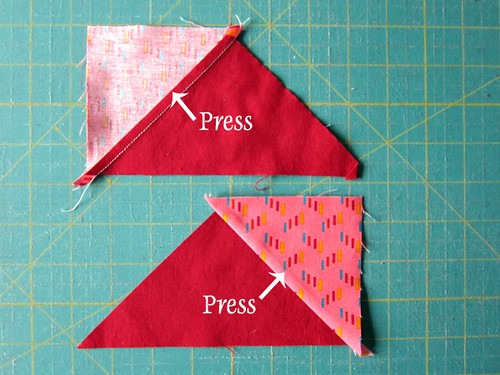
Press the seam to the side, with the geese triangle pressed towards the side triangle. First press from the wrong side. Then, flip it over and press again against the seam, pushing slightly towards the side triangle to make sure the seam is completely open.
This side-pressing technique gives the star a slightly raised appearance!
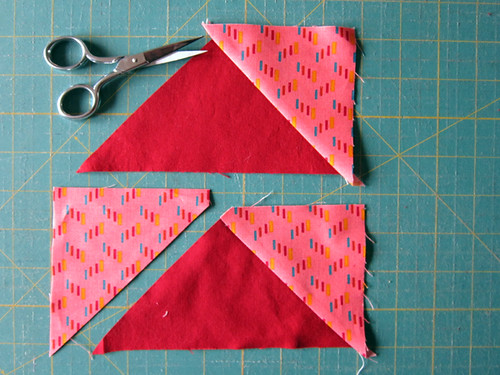
Trim off that bit that pokes out at the top of your sewn side triangle. You're cutting to make a smooth raw edge for the next side triangle to join in. Cut with scissors or use a rotary cutter/ruler if that feels best.
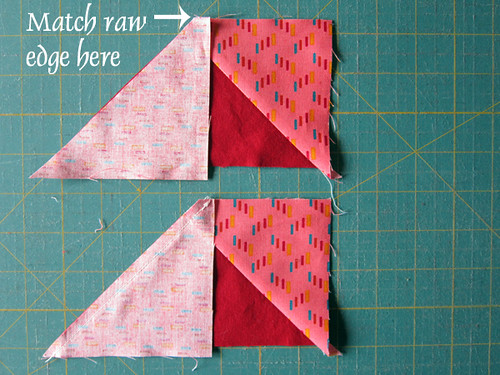
Flip the 2nd side triangle right sides together with the geese raw edge. This time, match up the blunt tip of the 2nd side triangle with the upper raw edge of the unit. Then sew with a 1/4" seam allowance.
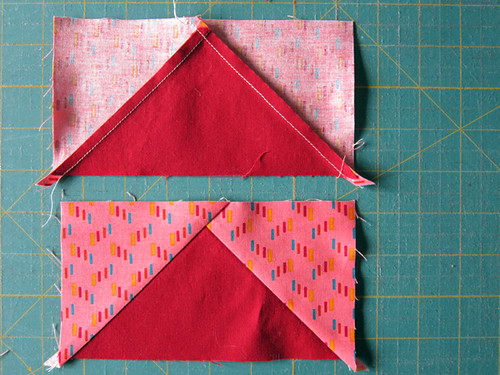
Press seam allowance to the side, again pressing towards the side triangle so that the geese triangle is exposed on the back. Press from the wrong side, then press from the right side, gently pushing the seam all the way to the side.
To save time, you can sew all of your flying geese units assembly line style. Sew 1 side triangle on all geese units. Press seams. Sew the 2nd side triangle on all units. Press seams.
Step 3: Trim Flying Geese Units
This is a very important step! Unless your 1/4" seam allowance is true and very straight, your flying geese won't come out perfectly. Knowing that this unit is a challenge for new quilters, these instructions result in an oversized unit that can be trimmed to precision. I'll demonstrate trimming with a 6.5" wide ruler, which makes the job easy. Then, I'll discuss how to trim without a 6.5" wide ruler.
Place your ruler on the geese unit. Match up a 1/4" ruler line to the center peak of the geese triangle. Shift so that the 1/4" ruler line is as close to the tip as possible, while keeping the block 3.5" wide. Note the bottom arrow at the red background. Before cutting, look at where the unit's raw edge ends under the ruler. The unit must be at least to 3.5" wide. It can be greater than 3.5" wide or at least 3.5" wide.
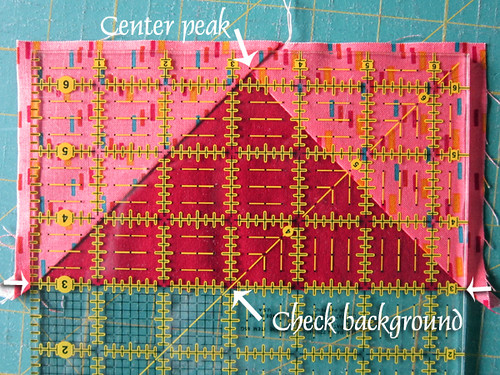
If you're cutting with a 6.5" wide ruler, as shown, also check that the sides of the ruler are hitting the block at approximately the same point. Then you know your geese will be straight, not slanty!
Now cut around the unit on all three exposed sides.
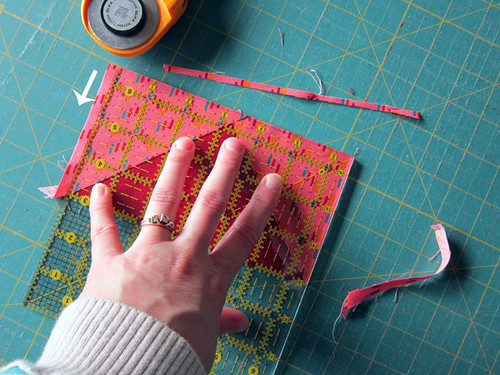
If you don't have a 6.5" wide ruler, first cut along the top long edge, measuring at 1/4" from the center peak, while making sure the unit will remain at least 3.5" wide. Then, trim a little along each short side so that the unit is 3.5" x 6.5". To do so, measure and cut at 3.25 from each side of the center peak.
Do not trim the long side of the unit along the background fabric! We'll trim that later when the block is completely assembled. Trim each flying geese unit to 3.5" (or more) by 6.5".
Step 4: Assemble Block
Return all pieces to the sawtooth star lay out. Notice that the corner squares at 3.75" square are wider than the flying geese units. This is intentional to provide extra fabric for trimming when the block is complete.
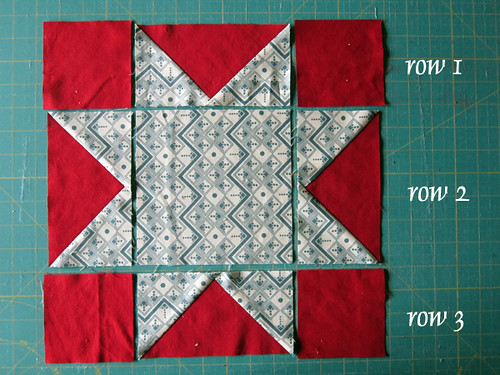
Join the units to create 3 rows. 1 corner square + 1 flying geese unit + 1 corner square make up row 1. As you piece the corner squares to a flying geese unit in rows 1 and 3, be sure to line up the raw edges so that the excess fabric is sticking out towards the outside corners of the block.
Try to sew very careful 1/4" seam allowances as you join these pieces to make 3 rows. Press seams open. Measure to make sure your rows are each 12.5" long or more. If they are less than 12.5" long your seam allowances are too big. You need to take apart those unit-joining seams and try for a more accurate 1/4" seam allowance.
Then, join the rows to complete the block. Use pins at the seam intersections to help match up points, if possible. If you can't get the seam intersections to match, that's ok too!
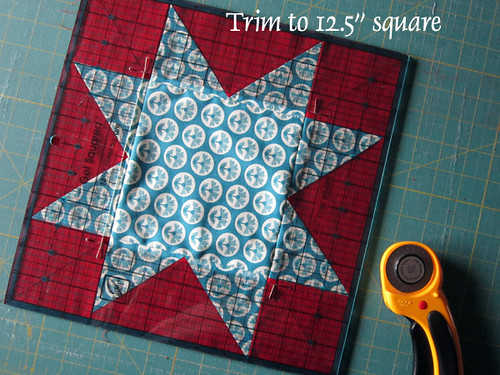
Trim the completed block to 12.5" square. That's your "unfinished" measurement. When sewn up into a quilt, each sawtooth star will be 12" finished. I'm using a 12.5" square ruler here, which helps me center things optimally to keep as many star points as possible. If you don't have a 12.5" ruler, just use the lines on your cutting mat. Place the block on the cutting mat so that it is centered over a 12.5" space and then cut around it at 12.5" without moving the block.
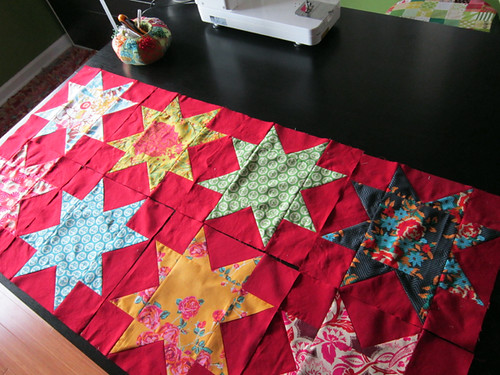
Make lots and lots of stars! I need 30 stars for a 60" x 72" throw quilt. I'm using Kona Rich Red for the background and Anna Maria Horner prints for the stars, including prints from Dowry and True Colors!
Have fun!